How to Build a Custom User Registration Form in WordPress
Want to make it super easy for your visitors to sign up on your WordPress site? Everything you need is right here!
No matter whether you are running a membership site, blog site or any other WordPress site, a smooth signup experience can ease things up. So for that, the only thing you need is a custom user registration form for your WordPress site.
A user registration form isn’t only about eye catching designs and dropping form fields. It’s about adding a touch of personalization and making your visitors’ sign up experience smooth.
Sounds interesting, right? So let’s make it happen.
In this blog, we’ll discuss every step from installing to configuring to publishing your WordPress user registration form. So, let’s dive in!
A user registration form is a custom form that allows your site visitors to sign up and create an account on your website.
A WordPress registration form mostly includes fields that ask for the visitor’s name, email, password and other information for creating an account.
Once a visitor registers using a user registration form, they become a user of your WordPress site. Users have their own accounts, bio and profile as well which lets them access exclusive content, get personalized features or write comments on a WordPress site.
Well, the default WordPress registration form is like a basic form, asking for the basic information only such as visitors username and email.
However if you wanna make your sign up process a cake walk for your visitors, a custom user registration form makes the sign up process a lot easier. You can make your registration form match your website’s style. That’s why creating a custom user registration form is the way to go.
Still not convinced? Well, you’ll be now after we walk you through these benefits of building a WordPress custom user registration form. A custom user registration form helps:
With ARForms, you can make all these happen.
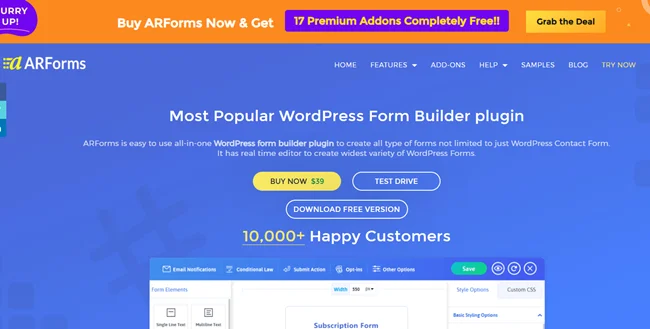
ARForms is an all-in-one WordPress form builder plugin, designed to create all kinds of custom forms with zero coding. It’s an excellent plugin for creating custom user registration forms. It comes with over 33+ advanced form fields and exclusive styling options for designing your form the way you want.
Moreover, it connects with over 24+ third party integrations and multiple addons to create a perfect user registration form in WordPress. Wanna see how? Here’s exactly how to do it.
The Best part? No coding is needed! You can create any kind of forms with just a simple drag and drop, whether it be a simple contact form or complex multi-step form.

Ready to install ARForms into your WordPress? Follow these steps to install your ARForms WordPress form builder plugin.
For more details, you can also follow our friendly user guide and get started with ARForms.
Now as we said earlier, if you have gone with ARForms Pro then this addon is already included in your package. However, if you have chosen ARForms Lite then still no worries. You can easily get started by purchasing it for only $17 for a single site.
Once you have successfully installed your ARForms in your WordPress, it’s time to activate the user Signup Addon.
To enable this addon, head over to ARForms → Addons.
You have to scroll down to the section of “Additional Functionality Add-ons” and there you’ll see it as the first thing in the list.

All you have to do is click on “Active” and that’s it! Now your user Signup Addon is activated.
The second you activate this addon, a new panel with the title “User Signup Configuration” will appear. Yet for now, let’s jump to the next step.
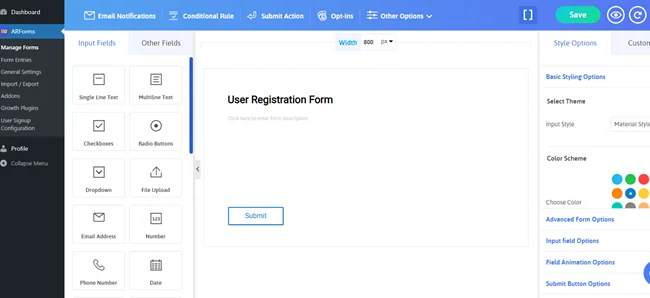
To create a new user registration form, you have go to Manage Forms Add New Form
Next, a new popup modal window will be open and as you can see it has three options.

If you want to make your form quickly, you can go with ARForms pre-built templates. Or want to launch your new user registration form in just a few minutes then go with our ready-to-go sample form.
To help you understand how to create a custom user registration form, we’ll go with Blank Form to build it from the starch which is also pretty easy.
Once you decide, Add your Form Title and Form Description. No need to worry as you can change it later too. Now select the style for your form input. Now let’s continue to the live form editor and modify our form.

Once in, you can see the ARForms form editor. In the left panel, you get over 33+ advanced form fields. In the right panel, you get exclusive styling options to customize your custom user registration form the way you want.
Here’s the list of basic registration form fields you can add:
You can also add more form fields based on the kind of custom user registration form you want to create. However, we always recommend only asking for the details which are necessary only to make your forms GDPR compliant.
All you have to do is drag and drop all these fields using ARForms simple drag and drop interface. Once done, you can easily change their position, resize them and even change their field settings.
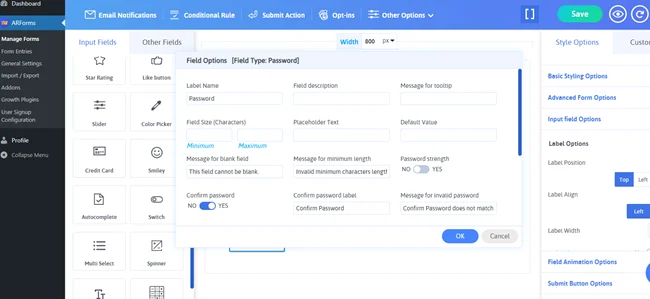
After dragging down the password field, you might be looking for the “Confirm Password” field.
For that, you have to go to the “Fields Setting” of your current password field. Now toggle on the “Confirm Password” to Yes. You can also toggle on the “Password Strength” to let your visitor create a strong password.
Lastly, make sure all the fields you have added are set as “Required”, not optional.
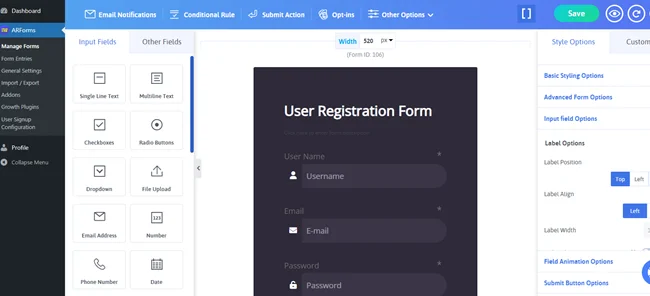
Now you can take a look at the right side panel,”Style Options”. From here, you can design your user registration form to match perfectly with your website’s look and feel. It allows you to modify and customize each and every field, even submit buttons of your form to create a vibe of personalization.
ARForms allows you to add Font Awesome icons to ARForms for sleek and modern form design. Along with options to modify your font settings, background image, 15 color schemes with the responsive and mobile friendly form designs seamlessly.

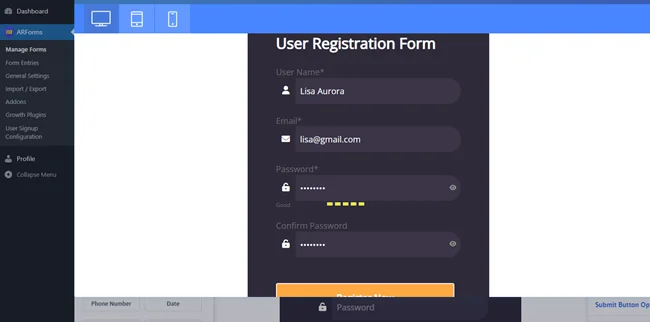
Once you have customised your user registration form the way you want, you can leverage ARForms quick live preview. It helps you see how your form will appear in real life across multiple devices.
Simply click on the eye icon on the top-left toolbar and see the live preview of your WordPress custom user registration form.

Moreover, this addon also auto-populates forms with the user’s logged-in information, saving the hassle of remembering and entering details every time.
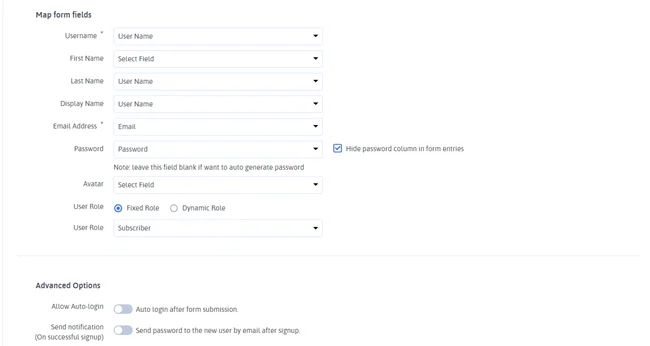
So, first you have to go to the User Signup Configuration → Configure New Set.
First you have to map your newly created form with the WordPress registration form. So select the form you have created and map it inside this section “Map form with WordPress registration form”.

After you mapped your user registration form, map its form fields the same way as well to WordPress user fields.
If you haven’t created other fields, you can leave them as it is. And if you have created other fields, map them too.
Now choose the user role which as two options:
If you select fixed roles, the roles of every user who registers will be the same every time. But if you go with a dynamic role, multiple users can register with the same form.
To keep it simple, we’ll go with “Fixed Role” for now.

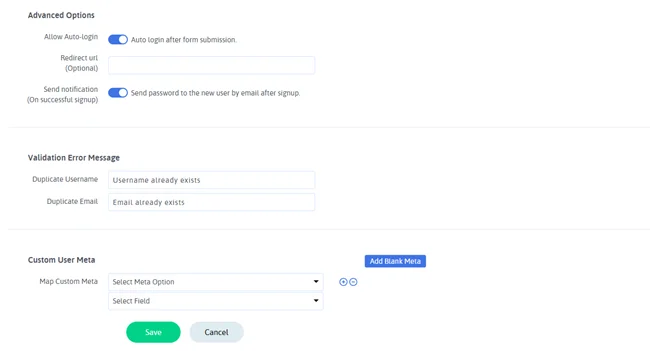
Last but not the least, you have to enable advanced options.
Here you’ll get options for allowing auto-login after form submission and send notification of password to the new user by email on successful signup.
You can also enter the redirect URL to redirect users to another page after the successful registration.
Moreover, you’ll also get options to customize the error validation messages and custom meta user.

Once everything is done, click on “Save” and your user signup / registration settings are now configured properly.

After setting up your new custom user registration form, simply copy the shortcode of it from the “Manage Forms”.
After that, simply paste the shortcode of your form wherever you like on your WordPress page, post or any other content area. Now make your form go live and start taking new registrations!
A custom user registration form is way more useful and better than a default one. In this, you can add a touch of personalization, get power to choose your own custom form fields and design them as well. A user registration form may appear like a normal thing but making the registration process smooth can actually enhance your users experience and conversion rates.
So start creating your WordPress custom user registration form today with ARForms in just a few minutes – No coding, No hassle!
You can use a powerful WordPress form builder plugin such as ARForms to create custom forms on WordPress. ARForms is an all-in-one form builder for creating all kinds of custom forms with a simple drag and drop form editor.
Read this also:
No matter whether you are running a membership site, blog site or any other WordPress site, a smooth signup experience can ease things up. So for that, the only thing you need is a custom user registration form for your WordPress site.
A user registration form isn’t only about eye catching designs and dropping form fields. It’s about adding a touch of personalization and making your visitors’ sign up experience smooth.
Sounds interesting, right? So let’s make it happen.
In this blog, we’ll discuss every step from installing to configuring to publishing your WordPress user registration form. So, let’s dive in!
What is a User Registration Form?
Before starting on how to create a user registration form in WordPress, why not first understand what is one.A user registration form is a custom form that allows your site visitors to sign up and create an account on your website.
A WordPress registration form mostly includes fields that ask for the visitor’s name, email, password and other information for creating an account.
Once a visitor registers using a user registration form, they become a user of your WordPress site. Users have their own accounts, bio and profile as well which lets them access exclusive content, get personalized features or write comments on a WordPress site.
Why Create a Custom User Registration Form in WordPress?
Now you might be asking yourself, “Why create a custom user registration form when WordPress already provides a default one?”Well, the default WordPress registration form is like a basic form, asking for the basic information only such as visitors username and email.
However if you wanna make your sign up process a cake walk for your visitors, a custom user registration form makes the sign up process a lot easier. You can make your registration form match your website’s style. That’s why creating a custom user registration form is the way to go.
Still not convinced? Well, you’ll be now after we walk you through these benefits of building a WordPress custom user registration form. A custom user registration form helps:
- Collect specific user information other than just a simple name and email.
- Enhanced your user experience and brand image
- Add extra layer of security with reCAPTCHA
- Getting full control over user roles and permissions
- Integrate with marketing or payment gateways too
With ARForms, you can make all these happen.
ARForms is an all-in-one WordPress form builder plugin, designed to create all kinds of custom forms with zero coding. It’s an excellent plugin for creating custom user registration forms. It comes with over 33+ advanced form fields and exclusive styling options for designing your form the way you want.
Moreover, it connects with over 24+ third party integrations and multiple addons to create a perfect user registration form in WordPress. Wanna see how? Here’s exactly how to do it.
How to Create a Custom User Registration Form In WordPress with ARForms?
Step 1: Install ARForms Plugin
ARForms is the best form builder for creating WordPress signup forms in just a few seconds. If you go with ARForms Lite which is absolutely free, you can still create simple contact forms along with free Google reCAPTCHA. However, If you go with ARForms Pro then you get all advanced features and addons unlocked for lifetime at just $39.The Best part? No coding is needed! You can create any kind of forms with just a simple drag and drop, whether it be a simple contact form or complex multi-step form.
Ready to install ARForms into your WordPress? Follow these steps to install your ARForms WordPress form builder plugin.
- Once you have downloaded the zip file of your ARForms, go to your WordPress dashboard
- In your WordPress dashboard, go to Plugins → Add New → Upload.
- Upload the ZIP of ARForms and click on “install now”.
- Lastly when the installation is done, just click on Active Plugins and it’s all done.
For more details, you can also follow our friendly user guide and get started with ARForms.
Step 2: Enable User Signup Addon
Next, it is time to activate the User Signup Integration.Now as we said earlier, if you have gone with ARForms Pro then this addon is already included in your package. However, if you have chosen ARForms Lite then still no worries. You can easily get started by purchasing it for only $17 for a single site.
Once you have successfully installed your ARForms in your WordPress, it’s time to activate the user Signup Addon.
To enable this addon, head over to ARForms → Addons.
You have to scroll down to the section of “Additional Functionality Add-ons” and there you’ll see it as the first thing in the list.
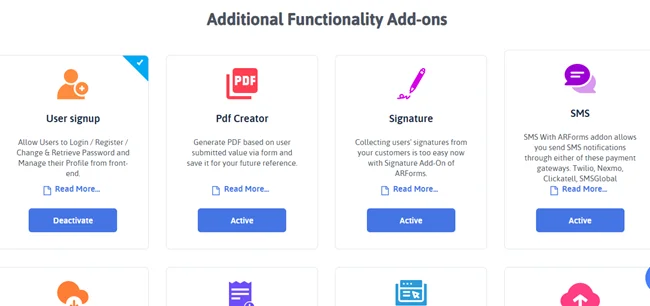
All you have to do is click on “Active” and that’s it! Now your user Signup Addon is activated.
The second you activate this addon, a new panel with the title “User Signup Configuration” will appear. Yet for now, let’s jump to the next step.
Step 3: Create a New User Registration Form
To create a new user registration form, you have to go to Manage Forms → Add New Form.To create a new user registration form, you have go to Manage Forms Add New Form
Next, a new popup modal window will be open and as you can see it has three options.
- Black Form
- Templates
- Sample Forms
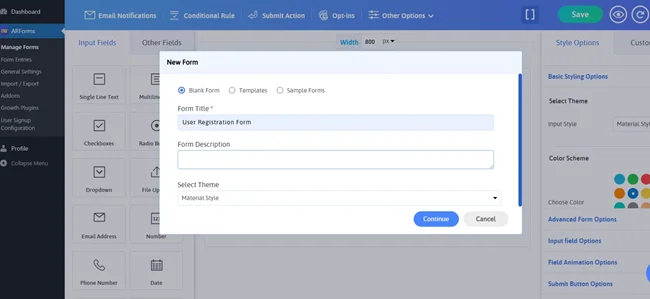
If you want to make your form quickly, you can go with ARForms pre-built templates. Or want to launch your new user registration form in just a few minutes then go with our ready-to-go sample form.
To help you understand how to create a custom user registration form, we’ll go with Blank Form to build it from the starch which is also pretty easy.
Once you decide, Add your Form Title and Form Description. No need to worry as you can change it later too. Now select the style for your form input. Now let’s continue to the live form editor and modify our form.
Step 4: Add Registration Form Fields
Once in, you can see the ARForms form editor. In the left panel, you get over 33+ advanced form fields. In the right panel, you get exclusive styling options to customize your custom user registration form the way you want.
Here’s the list of basic registration form fields you can add:
- Username
- First Name (Optional)
- Last Name (Optional)
- Phone (Optional)
- Password
- Confirm Password
You can also add more form fields based on the kind of custom user registration form you want to create. However, we always recommend only asking for the details which are necessary only to make your forms GDPR compliant.
All you have to do is drag and drop all these fields using ARForms simple drag and drop interface. Once done, you can easily change their position, resize them and even change their field settings.
After dragging down the password field, you might be looking for the “Confirm Password” field.
For that, you have to go to the “Fields Setting” of your current password field. Now toggle on the “Confirm Password” to Yes. You can also toggle on the “Password Strength” to let your visitor create a strong password.
Lastly, make sure all the fields you have added are set as “Required”, not optional.
Now you can take a look at the right side panel,”Style Options”. From here, you can design your user registration form to match perfectly with your website’s look and feel. It allows you to modify and customize each and every field, even submit buttons of your form to create a vibe of personalization.
ARForms allows you to add Font Awesome icons to ARForms for sleek and modern form design. Along with options to modify your font settings, background image, 15 color schemes with the responsive and mobile friendly form designs seamlessly.
Once you have customised your user registration form the way you want, you can leverage ARForms quick live preview. It helps you see how your form will appear in real life across multiple devices.
Simply click on the eye icon on the top-left toolbar and see the live preview of your WordPress custom user registration form.
Step 5: Configure User Signup/Registration Settings
The ARForms User Signup Addon allows your visitors to register on your WordPress site. Plus, once they become a user, they can also edit their profile, change their password and retrieve their password from the front-end.Moreover, this addon also auto-populates forms with the user’s logged-in information, saving the hassle of remembering and entering details every time.
So, first you have to go to the User Signup Configuration → Configure New Set.
First you have to map your newly created form with the WordPress registration form. So select the form you have created and map it inside this section “Map form with WordPress registration form”.

After you mapped your user registration form, map its form fields the same way as well to WordPress user fields.
- Username → Username
- Email → Email
- Password → Password
If you haven’t created other fields, you can leave them as it is. And if you have created other fields, map them too.
Now choose the user role which as two options:
- Fixed Role
- Dynamic Role
If you select fixed roles, the roles of every user who registers will be the same every time. But if you go with a dynamic role, multiple users can register with the same form.
To keep it simple, we’ll go with “Fixed Role” for now.
Last but not the least, you have to enable advanced options.
Here you’ll get options for allowing auto-login after form submission and send notification of password to the new user by email on successful signup.
You can also enter the redirect URL to redirect users to another page after the successful registration.
Moreover, you’ll also get options to customize the error validation messages and custom meta user.
Once everything is done, click on “Save” and your user signup / registration settings are now configured properly.
Step 6: Publish the User Registration Form
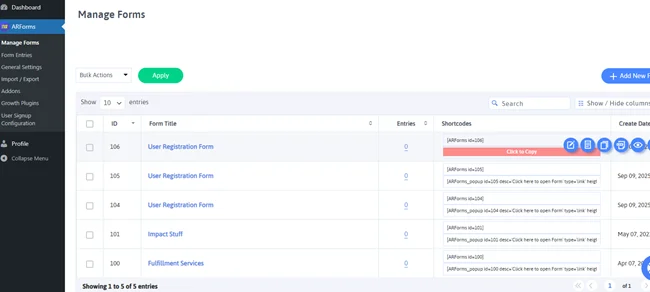
After setting up your new custom user registration form, simply copy the shortcode of it from the “Manage Forms”.
After that, simply paste the shortcode of your form wherever you like on your WordPress page, post or any other content area. Now make your form go live and start taking new registrations!
Let’s Wrap it Up
So that’s it for today! We hope now you have understood how to build a custom user registration form in WordPress.A custom user registration form is way more useful and better than a default one. In this, you can add a touch of personalization, get power to choose your own custom form fields and design them as well. A user registration form may appear like a normal thing but making the registration process smooth can actually enhance your users experience and conversion rates.
So start creating your WordPress custom user registration form today with ARForms in just a few minutes – No coding, No hassle!
FAQs about WordPress User Registration Forms
What is a user registration form?
A user registration form is a custom form that allows your site visitors to sign up and create an account on your website. A user registration form mostly includes fields that ask for the visitor’s name, email, password and other information for creating an account.How to create a custom user registration form in WordPress?
To create a custom user registration form in WordPress, here’s the following steps:- Step 1: Install ARForms Plugin
- Step 2: Enable User Signup Addon
- Step 3: Create a New User Registration Form
- Step 4: Add Registration Form Fields
- Step 5: Configure User Signup/Registration Settings
- Step 6: Publish the User Registration Form
How to create a custom form on WordPress?
You can use a powerful WordPress form builder plugin such as ARForms to create custom forms on WordPress. ARForms is an all-in-one form builder for creating all kinds of custom forms with a simple drag and drop form editor.
How do I allow users to register in WordPress?
First you have to go to the Settings → General in your WordPress dashboard. From here, you have to check the box for “Anyone can register.” Thus, once you do this, you can use WordPress form builder plugins like ARForms. So now With it, your users can directly register themselves once you create a user registration form using ARForms User Signup Addon.Read this also: