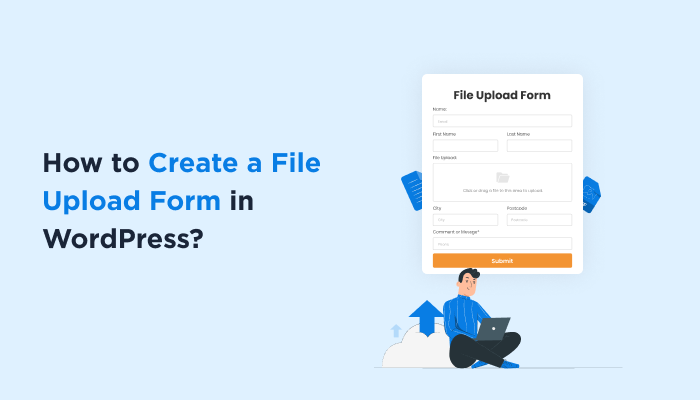
How to Create a File Upload Form in WordPress (Step-by-Step Guide)
Nowadays, a file upload form has become important for almost all websites. Thus making a file upload form in WordPress lets your visitors upload their documents, images or files easily.
However, adding a WordPress form with file upload with custom coding and designing can be a bit tricky.
That’s why whenever looking for a form builder plugin in WordPress, make sure it comes with file upload features. Not only that, but also ensure it offers smart features so both you and your customer can work with a friendly user interface.
In this guide, we’ll walk through each and every step for creating a file upload form in WordPress while also addressing your other concerns regarding upload forms. So, let’s dive in.
Well, you might be wondering why a file upload form is important – and whether it’s worth finding a plugin that supports it.
Let’s imagine your own WordPress site. Now if a visitor faces a problem while surfing your website and extending your full helping hand for it. However, sometimes users may find it hard to describe an issue clearly – and that’s when file upload form comes in handy. If you had a file upload field in your contact form or query form, then the user could easily attach screenshots. This can easily solve the issues for both user and customer support.
This was just one simple example. You can use file upload form for multiple scenarios such as collecting:
And so much more! Thus, there’s no denying a WordPress file upload plugin, it has multiple benefits. There’s no denying file upload forms are an essential need for every website. Start creating your own file upload form and streamline the process of file collection.
If you also want to collect resumes, photos and more with no more “oops~ forgot to upload files” moment, no complex coding, and zero designing experience, ARForms got you.
ARForms offers progressive file upload feature which lets your visitors upload multiple files effortlessly. What’s more interesting is all forms are AJAX-based, meaning submissions are super fast with live uploading progress, no more page reloading.
So, allow us to show you the easiest way to create a file upload form with ARForms.
ARForms is an easy to use WordPress form builder plugin to create all types of forms. Along with its simple drag and drop builder, creating a file upload form will be super easy for you.

Just choose your ARForms plan and get started!
Once successfully downloaded the zip file, go to your WordPress Dashboard → Plugins → Add New. Simply upload the zip file and activate the plugin.
To do so, you have to go to your WordPress Dashboard → ARForms → Add New Form, on the top right corner.

Simply click on “Add New Form” then you’ll be shown three options for your new form.

Choose a blank form or select a ready-made template and fill in simple details such as form title, description and theme. Lastly click on “continue” to customize your form.
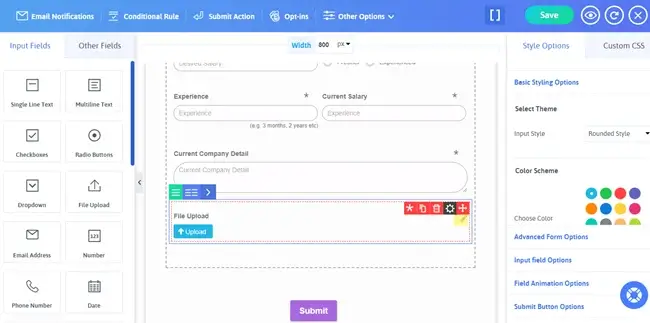
In the form editor, just click once the File Upload field and it’ll be on your form layout.

Now click on the file upload field and you’ll see multiple options to customize it.
You’ll see multiple options such as:

Next click on the “Field Setting” option on the particular upload file field. A popup model will show up with the following settings.

From here, you can enable settings for:
After setting up your field options, click on “OK”. Now your file upload form field is ready to go.
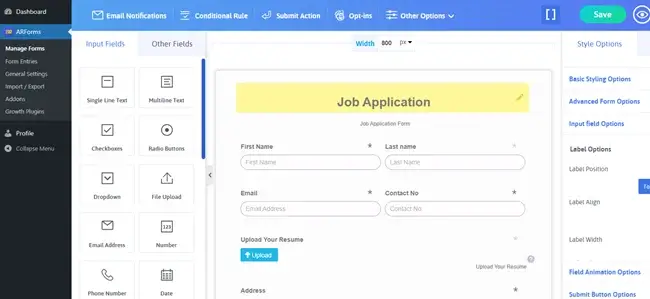
Remember you can add extra fields by simply just dragging it out of the “Input Field” and “Other Fields” sections. Just drag, drop and customize!
Next customize and style your file upload form as you like.

Edit other fields the same way we did with file upload fields.
If you go with the ready-to-go templates or sample forms, then a big congratulations! Your form is already 90% ready to go!
Now all is left to style it accordingly to match your website’s theme.
ARForms has a wide range of stylish options, including basic, advanced and custom for every type of form.
With these built-in styling tools and real time form editor, your professional form will be perfect to match your website’s style.
Alongside 33+ advanced and basic field types and quick live preview, your forms are ready to go!

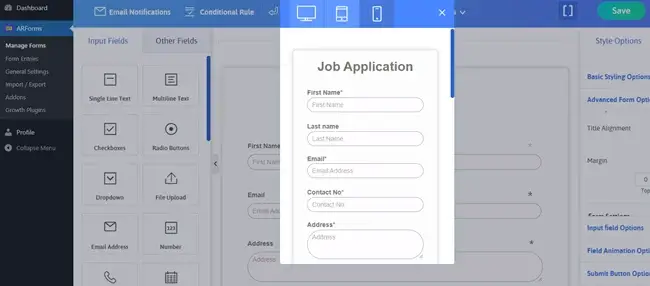
You can also see in the live preview that your file upload form will appear on different devices. After all, every ARForms form is fully customizable and responsive.

Moreover, if you feel you wanna embed Google maps or Youtube Videos into your form for a more interactive feel, you can do it right here.
Suppose Let’s say you have a student survey form. To keep your form user-friendly, it’s best to avoid unnecessary fields – so what’s the smart way to simplify? You can opt for conditional logic. If a student decides he wants to upload his mark sheet, then he clicks on the “yes” radio button. Next, a file upload field will automatically show up! However, Clicking ‘No’ will simply keep things as they are. This way your form maintains its simplicity while also offering advanced fields if wanted.
With ARForms, you can set conditional logic on different fields and operate in different ways. Let’s see.
To enable this advanced feature, simply go to the Conditional Rule → Set your “IF” field → Set your “THEN” field.

Next click on the “OK” button and now your conditional logic is set to go!
Send submitted files to your email or admin, and show a success message or redirect after submission.
Click on “Email Notification” and Tick on “Send an Automatic Response to User after form submission” option.

From here, you can set a select field to send E-mail, subject of Email, and more. You can also make your own email templates and personalize it with simple ARForms shortcodes.
Thus, you can send submitted files to your email or admin of your file upload form.
Next, if you want to show a success message or redirect after submission, ARForms offers 4 different types of form submission action.
Simply click on “Submit Action” and a pop up box will show up with multiple options.

Choose your form submission action, custom confirmation messages and more to give your visitors a personalized, professional experiences.
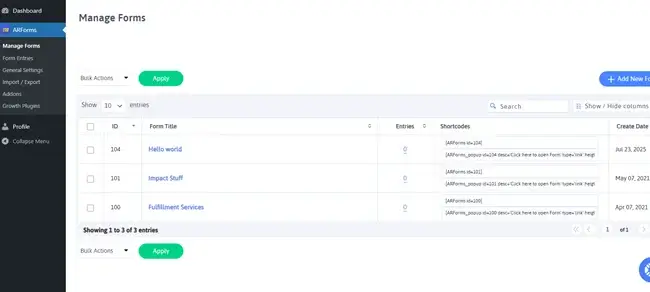
Simply go to “Manage Forms” and copy the form shortcode from ARForms. When the shortcode is successfully copied, simply paste it into any WordPress page, post, or sidebar. Now your file upload form is ready to go live!!

Once your form is live, you can easily test how it appears in your website and email notifications.
So, for security concerns, ARForms has a max limit on file upload and only legit file types only. However, even in these legit file types, we have multiple options. Afterall, All forms designed with ARForms are secured with GDPR-Compliant, reCAPTCHA and Invisible Spam Protection.
Imagine it’s a job application form, then you can specifically set that your applicants must upload their resume or CV in pdf format, not image or zip. Or if it’s a customer support form, then you can allow multiple types of images but refuse exe or csv files to avoid errors.
Here’s a list of files types your visitors can upload :
Make powerful WordPress forms with ease, no matter how complex or simple they are. ARForms give you user friendly designs with dozens of form builder features for creating a professional and engaging form.
Furthermore, it comes with 50+ fully designed free form samples, professional templates to kickstart your project. With a set of robust features like Conditional Logic, Math logic, Progressive File Upload, Autosave Form Progress, and more, publish your forms with ease.
What’s more interesting is you get over 24+ third party integrations, payment gateways and amazing functionality addons for lifetime with ARForms Pro.
Thus, Start creating your own file upload form and elevate the true potential of your website!
Read this also:
However, adding a WordPress form with file upload with custom coding and designing can be a bit tricky.
That’s why whenever looking for a form builder plugin in WordPress, make sure it comes with file upload features. Not only that, but also ensure it offers smart features so both you and your customer can work with a friendly user interface.
In this guide, we’ll walk through each and every step for creating a file upload form in WordPress while also addressing your other concerns regarding upload forms. So, let’s dive in.
What is a File Upload Form in WordPress?
A WordPress file upload form lets visitors upload files to your websites. While WordPress doesn’t come with an in-built file upload feature, it offers WordPress form builders or file upload plugin in WordPress to make form upload fields and customization options.Well, you might be wondering why a file upload form is important – and whether it’s worth finding a plugin that supports it.
Let’s imagine your own WordPress site. Now if a visitor faces a problem while surfing your website and extending your full helping hand for it. However, sometimes users may find it hard to describe an issue clearly – and that’s when file upload form comes in handy. If you had a file upload field in your contact form or query form, then the user could easily attach screenshots. This can easily solve the issues for both user and customer support.
This was just one simple example. You can use file upload form for multiple scenarios such as collecting:
- Resumes or cover letter for job applications
- Photos, videos, or other media from users for contests or feedbacks
- Audio clips for podcasts
- IDs or other required document for event registration
- Project zip files or design files for graphic designing or client service
And so much more! Thus, there’s no denying a WordPress file upload plugin, it has multiple benefits. There’s no denying file upload forms are an essential need for every website. Start creating your own file upload form and streamline the process of file collection.
If you also want to collect resumes, photos and more with no more “oops~ forgot to upload files” moment, no complex coding, and zero designing experience, ARForms got you.
ARForms offers progressive file upload feature which lets your visitors upload multiple files effortlessly. What’s more interesting is all forms are AJAX-based, meaning submissions are super fast with live uploading progress, no more page reloading.
So, allow us to show you the easiest way to create a file upload form with ARForms.
How to Create a File Upload Form with ARForms?
Step 1: Install the ARForms Plugin
To start, first you need to install ARForms.ARForms is an easy to use WordPress form builder plugin to create all types of forms. Along with its simple drag and drop builder, creating a file upload form will be super easy for you.

Just choose your ARForms plan and get started!
Once successfully downloaded the zip file, go to your WordPress Dashboard → Plugins → Add New. Simply upload the zip file and activate the plugin.
Step 2: Create a New Form or Choose Template
Next, you have to create a new form.To do so, you have to go to your WordPress Dashboard → ARForms → Add New Form, on the top right corner.
Simply click on “Add New Form” then you’ll be shown three options for your new form.
- Black Form
- Templates
- Sample Forms
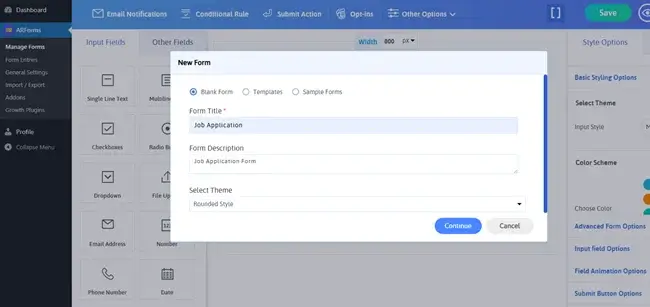
Choose a blank form or select a ready-made template and fill in simple details such as form title, description and theme. Lastly click on “continue” to customize your form.
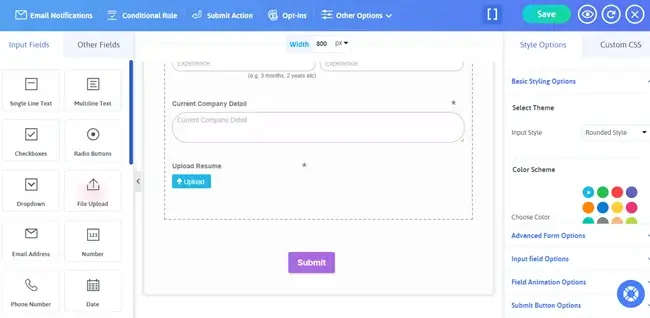
Step 3: Add a File Upload Field and Any Other Required Fields
Now you can add the fields we want as per your form. It can either be a simple contact form or a complex multi-step form for survey, ARForms makes building any form easy.In the form editor, just click once the File Upload field and it’ll be on your form layout.
Now click on the file upload field and you’ll see multiple options to customize it.
You’ll see multiple options such as:
- Adjusting field size
- Making it required
- Duplicating field
- Delete field
- Multi-column and resizable option
- And field settings.
Next click on the “Field Setting” option on the particular upload file field. A popup model will show up with the following settings.
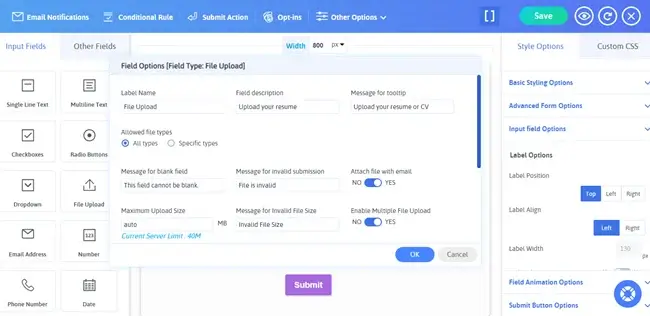
From here, you can enable settings for:
- Multiple file uploads
- Allowed file types (All types or Specific types)
- Attach file with email
- Label name, description and tooltip
- Specific messages for invalid action
- Maximum file size
After setting up your field options, click on “OK”. Now your file upload form field is ready to go.
Remember you can add extra fields by simply just dragging it out of the “Input Field” and “Other Fields” sections. Just drag, drop and customize!
Step 4: Customize the WordPress File Upload Form
Next customize and style your file upload form as you like.
Edit other fields the same way we did with file upload fields.
If you go with the ready-to-go templates or sample forms, then a big congratulations! Your form is already 90% ready to go!
Now all is left to style it accordingly to match your website’s theme.
ARForms has a wide range of stylish options, including basic, advanced and custom for every type of form.
- Basic Styling Options: Offers different input styles such as Material Style Form, Rounded Style Form, and Standard Style Form. Moreover you can also choose font family, size, styles, color schemes and more.
- Advanced Form Options: Now you can decide whether you want to show/hide Form Title and Description with a simple toggle button. Moreover you can set title and form alignment, margin, background image and its positions, border and much more.
- Field Level Styling: We understand how much every detail matters for better personalization in forms. Thus we also have field level stylish you style your field every detail pixel by pixel.
- Field Animation Options: With more than 70+ unique animation styles, make your form more fun and engaging. With amazing options such as On Load animation and Page Break Animation, decide what your form wants.
- Submit Button Styling: Style your only button easily with pre-defined options. Beautify your submit button your way! Apply shadow effect, set alignment, border style, background image and more.
- Error Validation Styling: Display form feedback in a clean and user-friendly way! We all know validation and error messages frustrate visitors, so why not make them engaging and interactive to look fun. Manage font, message color, message background color, styles, positions and more.
- Custom CSS: While these built-in options are more than enough, if you are a tech-savvy guy and want to take the lead. You can also write custom CSS and style it your way!
With these built-in styling tools and real time form editor, your professional form will be perfect to match your website’s style.
Alongside 33+ advanced and basic field types and quick live preview, your forms are ready to go!
You can also see in the live preview that your file upload form will appear on different devices. After all, every ARForms form is fully customizable and responsive.
Moreover, if you feel you wanna embed Google maps or Youtube Videos into your form for a more interactive feel, you can do it right here.
Step 5: Use Conditional Logic (Optional, Pro Feature)
Want to make some interactive forms? No Worries! ARForms also has conditional logic to design your file upload form like an interactive game.Suppose Let’s say you have a student survey form. To keep your form user-friendly, it’s best to avoid unnecessary fields – so what’s the smart way to simplify? You can opt for conditional logic. If a student decides he wants to upload his mark sheet, then he clicks on the “yes” radio button. Next, a file upload field will automatically show up! However, Clicking ‘No’ will simply keep things as they are. This way your form maintains its simplicity while also offering advanced fields if wanted.
With ARForms, you can set conditional logic on different fields and operate in different ways. Let’s see.
- Show Field
- Hide Field
- Enable Field
- Disable Field
- Set Value of Field
To enable this advanced feature, simply go to the Conditional Rule → Set your “IF” field → Set your “THEN” field.
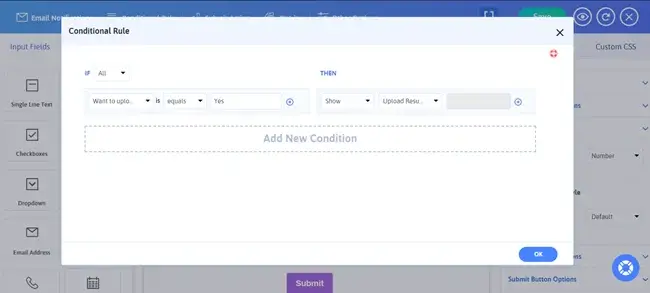
Next click on the “OK” button and now your conditional logic is set to go!
Step 6: Set Up Email Notifications and Form Submission Options
Now your file upload form is completely ready to launch! Yet before that, it’s time to set up automatic email notifications and form submission options if you want.Send submitted files to your email or admin, and show a success message or redirect after submission.
Click on “Email Notification” and Tick on “Send an Automatic Response to User after form submission” option.
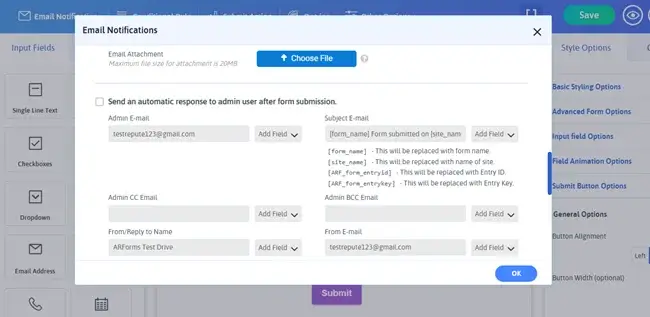
From here, you can set a select field to send E-mail, subject of Email, and more. You can also make your own email templates and personalize it with simple ARForms shortcodes.
Thus, you can send submitted files to your email or admin of your file upload form.
Next, if you want to show a success message or redirect after submission, ARForms offers 4 different types of form submission action.
- Conditional Form Submission
- Prevent Duplicate Entries
- Hide Form After Submission
- Restrict Submission for Date Range
Simply click on “Submit Action” and a pop up box will show up with multiple options.
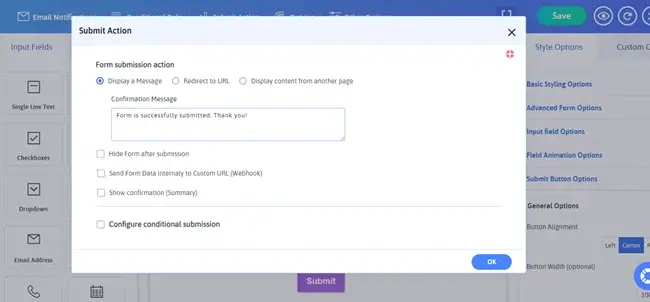
Choose your form submission action, custom confirmation messages and more to give your visitors a personalized, professional experiences.
Step 7: Publish the Form & Test it
Finally! Everything is in place and the only thing left to do is publish your form on your page and post.Simply go to “Manage Forms” and copy the form shortcode from ARForms. When the shortcode is successfully copied, simply paste it into any WordPress page, post, or sidebar. Now your file upload form is ready to go live!!

Once your form is live, you can easily test how it appears in your website and email notifications.
Which File Types Are Allowed for Upload?
Well, ARMember allows multiple file types for uploading, offering more flexibility than any other form builder ever. You can also decide which specific type of file your visit can upload in your upload form field to avoid confusion.So, for security concerns, ARForms has a max limit on file upload and only legit file types only. However, even in these legit file types, we have multiple options. Afterall, All forms designed with ARForms are secured with GDPR-Compliant, reCAPTCHA and Invisible Spam Protection.
Imagine it’s a job application form, then you can specifically set that your applicants must upload their resume or CV in pdf format, not image or zip. Or if it’s a customer support form, then you can allow multiple types of images but refuse exe or csv files to avoid errors.
Here’s a list of files types your visitors can upload :
- Documents: PDF, DOC, DOCX, DOCM, ODT, PPT, PPTX, PPTM, PPS, PPSM, POT, XLS, XLSX, XLSM, XLSB, XLA, XLT, XLW, KEY, XSDD
- Images:JPG, JPEG, JPE, PNG, GIF, AVIF, HEIC, HEIF
- Audio:MP3, M4A, M4B, FLAC, OGG, OGA, MID, MIDI, WAV, X-WAV
- Video:MP4, M4V, MOV, QT, AVI, FLV, MPEG, MPG, MPE, 3GP, 3GPP, 3G2, 3GP2, WEBM, OGV
Final Thoughts : Simplify File Collection on Your Site
So for this guide, we have walked through the easiest steps to create your file upload form in WordPress. Whether you want a simple contact form or a complex multi-step survey form, ARForms will let you turn any kind of form into a file upload form.Make powerful WordPress forms with ease, no matter how complex or simple they are. ARForms give you user friendly designs with dozens of form builder features for creating a professional and engaging form.
Furthermore, it comes with 50+ fully designed free form samples, professional templates to kickstart your project. With a set of robust features like Conditional Logic, Math logic, Progressive File Upload, Autosave Form Progress, and more, publish your forms with ease.
What’s more interesting is you get over 24+ third party integrations, payment gateways and amazing functionality addons for lifetime with ARForms Pro.
Thus, Start creating your own file upload form and elevate the true potential of your website!
FAQs on File Uploads in WordPress
How do I create a file upload form in WordPress?
You can create a file upload form easily with the right form builder plugin like ARForms. Just install it and create your own form with the upload file field. Customize its style and settings for deciding the max file size, uploading multiple files and more.Can I create a file upload form in WordPress without plugins?
Sure you can. However you must be a tech savvy guy or developer with good knowledge of CSS, HTML, JS and PHP. If you choose to build a file upload form without a plugin, you can manage the uploaded files manually for full control.How do I upload multiple files to WordPress through a form?
Simply toggle on the “Enable multiple files upload” option in the File Upload field settings in ARForms. Now your visitors can upload as many files as they want at once.What file types can I upload on WordPress forms?
You can upload multiple commonly used and popular file types on WordPress form. If you make WordPress forms with ARForms, you can add popular file types like PDF, DOCX, JPG, PNG, MP4, MP3, XLSX, and many more, including advanced formats like HEIC, AVIF, and 3GP.Where are uploaded files stored in WordPress?
Mostly, all uploaded files are stored in your WordPress server. Inside, /wp-content/uploads/ directory by default. However, you can also access them directly in your ARForms “Form Entries” dashboard.Read this also: