How to Create Gutenberg-Native Popups in WordPress
Most WordPress popup plugins come with a built-in drag-and-drop editor. That sounds convenient until you realize it means learning yet another interface on top of the WordPress block editor you already use every day.
If you’ve been building your site with the Gutenberg block editor, you already know how to create beautiful layouts with headings, images, buttons, videos, and columns. So why should adding a popup feel like a completely different workflow?
That’s exactly the problem that Gutenberg-native popup plugins solve. And in this guide, we’ll show you how to create popups in WordPress using ConvertForce, a block-based popup builder that works entirely inside the WordPress editor you already know.
No extra editor to learn. No page builder required. Just Gutenberg blocks.
What Are Gutenberg-Native Popups?
A Gutenberg-native popup is a popup you build using the WordPress block editor (Gutenberg) instead of a separate, proprietary drag-and-drop interface.
With most traditional popup plugins, you’re locked into the plugin’s own editor. You can only add the content elements the plugin supports, usually a headline, a line of text, and a button. If you want anything more complex, like a video, a multi-column layout, or a custom image arrangement, you’re out of luck.
A Gutenberg-native popup builder flips this around. The popup canvas is a standard WordPress editor. Every core block like images, videos, buttons, headings, columns, embeds just works. If you can build it in a WordPress post, you can build it in your popup.
This matters a lot for two reasons:
- No learning curve. You already know how to use Gutenberg. You don’t need to learn a second editor.
- Real design flexibility. You’re not limited to what the popup plugin developers chose to support. Any block that works in WordPress works in your popup.
Why Use ConvertForce for Gutenberg-Native Popups?
ConvertForce is a lightweight WordPress popup builder built specifically for the block editor. It’s available for free on the WordPress.org plugin repository and covers the three most common popup formats – lightbox popups, notification bars, and slide-ins.
Here’s what makes it stand out:
- Fully Gutenberg-native: You build your popup content directly inside the WordPress block editor.
- Smart display conditions: Control exactly which pages, posts, or post types each popup appears on, so you’re never showing a generic message where it doesn’t belong.
- Multiple trigger options: The free version includes the page load trigger with a configurable delay. ConvertForce Pro adds exit intent, scroll depth, and user inactivity triggers.
- Display frequency controls: Set how often the same visitor sees a popup and what happens after they close it, so you stay helpful without becoming annoying.
- Three popup types in one plugin: Lightbox popups, top/bottom notification bars, and slide-ins are all covered under a single plugin.
- Lightweight: No bloated builder engine to slow down your site.
Now let’s get into how it actually works.
Steps to Create Gutenberg-Native Popups in WordPress
Step 1: Install and Activate ConvertForce
Head to your WordPress dashboard and go to Plugins → Add New. Search for “ConvertForce” and click Install Now on the ConvertForce popup builder plugin, then click Activate.
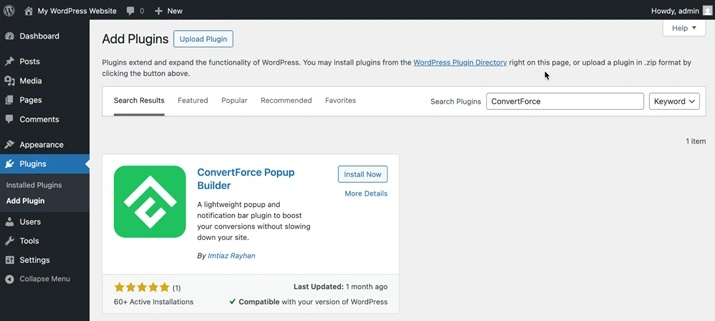
You can also download the plugin directly from the WordPress.org plugin repository and upload the zip file manually via Plugins → Add New → Upload Plugin.
Once activated, a new ConvertForce menu item appears in your WordPress admin sidebar.
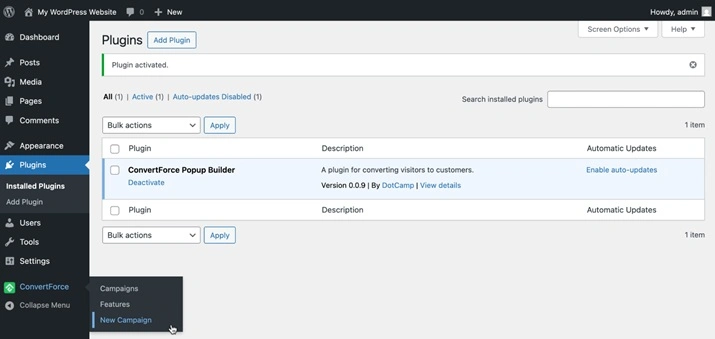
Step 2: Create a New Campaign
In your WordPress admin sidebar, go to ConvertForce → New Campaign.
Give your campaign a descriptive name you’ll recognize later, something like “Welcome Discount” or “Free Shipping Offer.” This is just for your own reference and won’t be visible to site visitors.
Next, choose your campaign type. ConvertForce supports three types:
- Lightbox: a modal popup that appears over your page content with a dimmed background
- Notification Bar: a slim bar that sticks to the top or bottom of the screen
- Slide-In: a panel that slides in from the corner of the screen
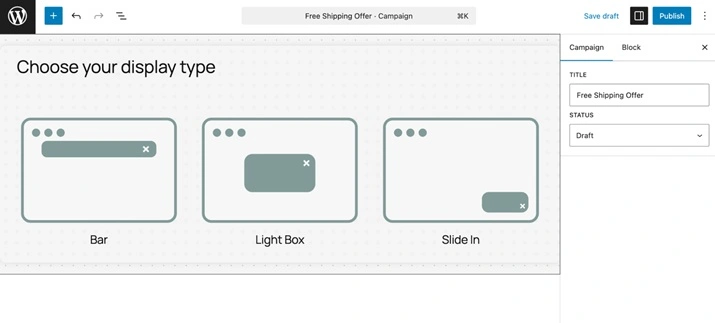
As we are going to create a popup here, select the lightbox type.
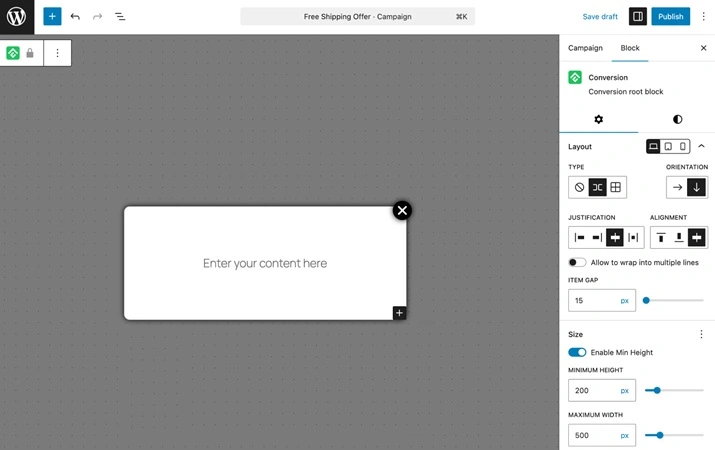
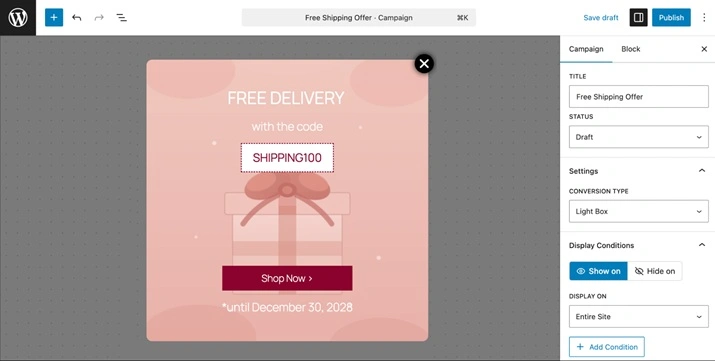
Step 3: Design Your Popup with Gutenberg Blocks
This is where ConvertForce really sets itself apart. The popup editor is a standard WordPress block editor. Click the + icon to open the block inserter, search for any block you want, and add it to your popup – exactly the same as editing a post or page.
Here are a few common popup types you can build:
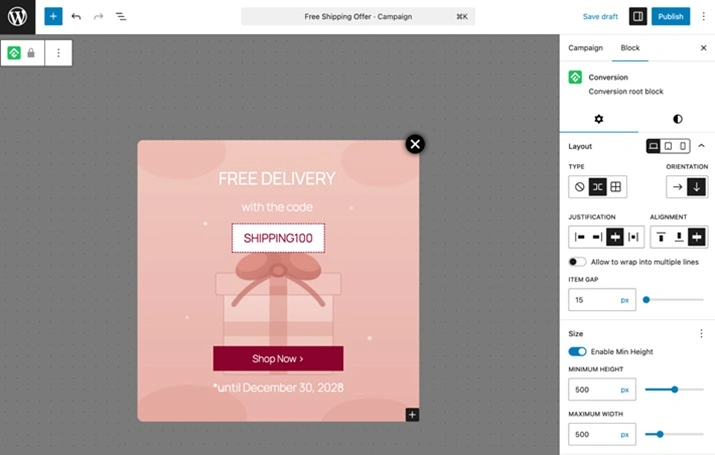
Lightbox with a headline and CTA button
Add a Heading block for your offer, a Paragraph block for a short supporting line, and a Button block pointing to your destination URL. This is the simplest and most common popup format.
Image popup
Add an Image block and upload your visual like a sale banner, a product launch graphic, or a coupon design. You can pair it with a button block to make it clickable.
Video popup
Add a Video block for self-hosted videos, or an Embed block for YouTube or Vimeo content. Paste in your URL and the video will play right inside the popup. This works well for product demos or welcome messages.
Multi-column layout
Use the Columns block to create side-by-side layouts, for example, an image on the left and a heading plus button on the right. The block flexibility is the whole point, so use it.
Once your content is set, you can also adjust the popup width, background color, and overlay settings from the sidebar panel.
Step 4: Set Display Conditions (Where It Appears)
By default, a new ConvertForce campaign is set to appear across your entire site. Targeted popups almost always perform better than site-wide ones, so it’s worth taking a moment here.
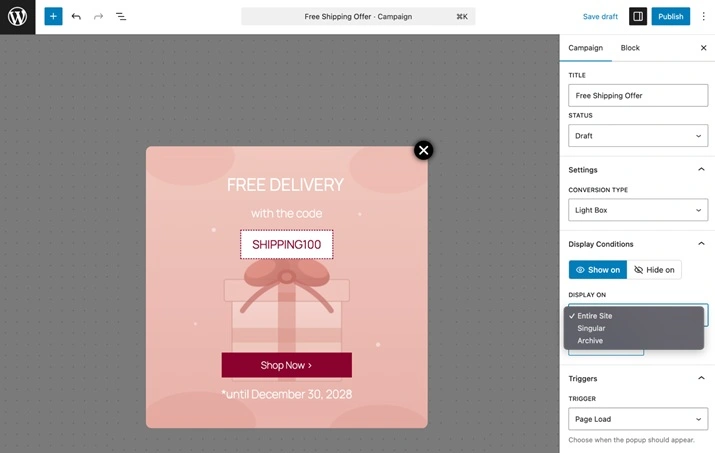
Under the Display Conditions panel, you can choose to show the popup on:
- All pages – shows everywhere on your site
- Specific pages or posts – pick individual pages or posts by name
- Specific post types – target all posts, all pages, or any custom post type
A popup offering a discount on a specific product will convert much better on that product page than on your homepage or blog. Match your popup to the context.
Pro Tip: If you’re running a lead generation popup, consider showing it only on your high-traffic blog posts rather than everywhere. It keeps the experience relevant and avoids fatiguing visitors who land on the homepage looking for something specific.
Step 5: Configure Triggers (When It Appears)
Once you’ve set where the popup shows, configure when it appears to visitors. ConvertForce handles this with triggers.
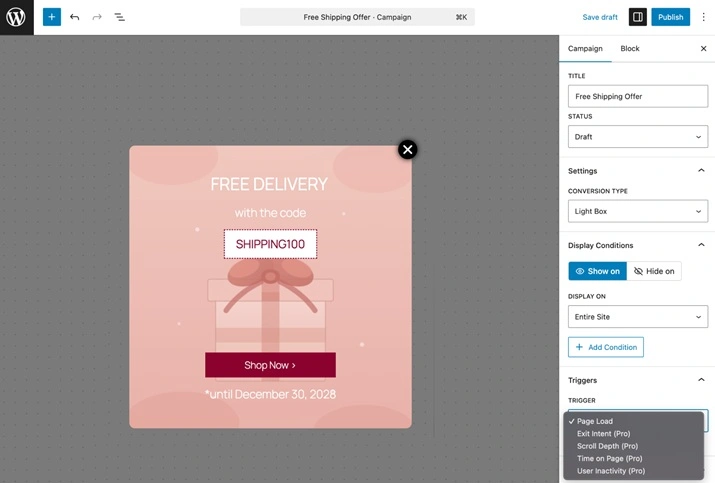
The free version includes the page load trigger, which fires the popup after the page finishes loading. You can set a time delay in seconds — giving visitors a moment to start engaging with your content before the popup appears. A delay of 5 to 10 seconds tends to work well for most sites.
If you upgrade to ConvertForce Pro, you also get access to:
- Exit intent – triggers the popup when a visitor moves their cursor toward the browser close button. On mobile, ConvertForce uses rapid scroll-up detection to detect the same intent.
- Scroll depth – triggers the popup after a visitor has scrolled a defined percentage of the page, which is a strong signal of engagement.
- User inactivity – triggers the popup after a visitor has been idle for a set duration.
For this tutorial, the page load trigger with a 7-second delay is a solid starting point.
Step 6: Set Display Behavior
Triggers tell ConvertForce when to show the popup. Display behavior settings tell it how often to show it and what happens after a visitor closes it.
There are two key controls here.
Display frequency – controls how often the same visitor sees the popup. Options are “Every page load” or “Once per session.”

When closed – controls what happens after the visitor dismisses the popup. Options are “Keep showing” or “Hide forever.”
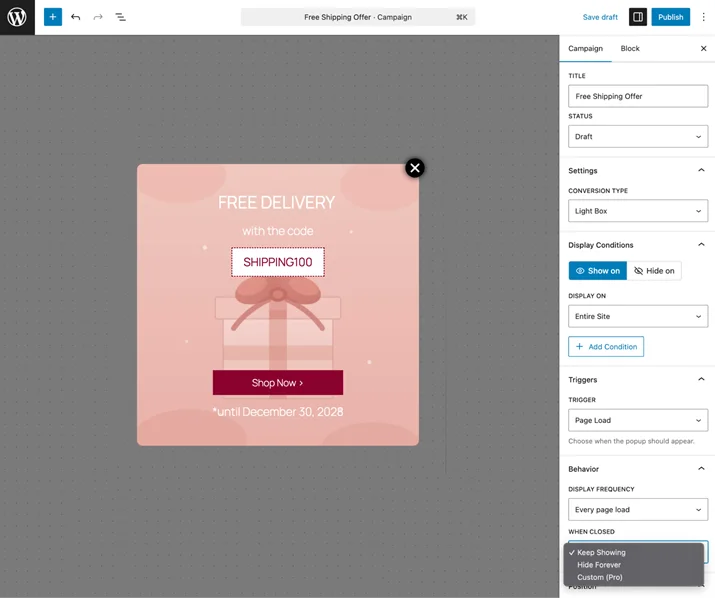
For most sites, the friendliest combination is Once per session plus Hide forever. This shows the popup to new visitors without pestering people who’ve already seen it and decided not to act. Aggressive popup behavior is one of the fastest ways to annoy visitors and push up your bounce rate, so on the side of being non-intrusive.
Step 7: Publish and Test Your Popup
Once everything is configured, click Publish to make your campaign live.
Now open your site in a new incognito browser window, this ensures you aren’t affected by any cached display rules from previous visits. Navigate to a page where the popup is set to appear and run through this quick checklist:
- The popup appears at the right time (respecting your trigger delay)
- The popup appears only on the correct pages
- All your blocks render correctly inside the popup
- The close button is clearly visible and easy to tap on mobile
- The popup looks good on small screens
- After closing, the popup doesn’t reappear (if you set “Hide forever”)
If anything looks off, head back to the campaign editor, make your adjustments, and update the campaign.
Tips for High-Converting Gutenberg Popups
Getting your popup live is step one. Getting it to actually convert takes a bit of thought. Here are a few principles that separate popups people engage with from popups they instantly dismiss:
Match the content format to the offer – A product demo is best shown as a video popup. A sale announcement works well as a notification bar. A lead magnet offer fits a lightbox. The block flexibility only helps if you use the right format for the job.
One popup, one job – The best popups are focused. Don’t try to promote three things at once or include two competing calls to action. Pick one goal per campaign.
Don’t trigger too aggressively – A popup that fires the instant someone lands on your page signals spam before they’ve read a single word. Give visitors a few seconds to engage with your content first. A short delay goes a long way.
Use page targeting – A popup that matches what the visitor is already reading converts far better than a generic site-wide message. Target your campaigns to the pages where they actually make sense.
Make the close button obvious – Visitors who feel trapped by a popup will leave your site entirely. A clearly visible close button is non-negotiable for both user experience and SEO.
Wrapping Up
Gutenberg-native popups are the most natural fit for WordPress sites that are already built on the block editor. Instead of maintaining two separate interfaces, one for your site content and one for your popups, ConvertForce lets you do everything in one place, with the blocks you already know.
The setup is straightforward: install the plugin, create a campaign, build your popup with Gutenberg blocks, set your display conditions and triggers, and publish. From there, it’s a matter of testing and refining based on how your visitors respond.
For more focused campaigns, you can also combine your popups with a dedicated landing page in WordPress to drive even stronger conversions.
You May Also Like:
- 10+ Best Social Media Plugins for WordPress in 2026
- 8 Best Ways To Grow Your Business With Web Form Builder
- Best Donation Form Templates for WordPress in 2026 (Free + Paid)
FAQs
What is a Gutenberg-native popup?
A Gutenberg-native popup is a popup you build using the WordPress block editor instead of a separate, proprietary drag-and-drop interface. You use the same blocks like images, videos, buttons, headings, columns, etc that you use to build any other content in WordPress.
Do I need a page builder to create popups in WordPress?
No. ConvertForce works entirely with core WordPress blocks, so you don’t need Elementor, Divi, or any other page builder. If you can build something in the WordPress editor, you can build it in a ConvertForce popup.
What types of popups does ConvertForce support?
ConvertForce supports three campaign types: lightbox popups (modal windows), notification bars (top or bottom), and slide-ins. All three are available in the free version.
Is ConvertForce free?
Yes. ConvertForce has a free version on the WordPress.org plugin repository. The free version includes lightbox popups, notification bars, slide-ins, and the page load trigger. ConvertForce Pro adds exit intent, scroll depth, and user inactivity triggers.
How do I stop a popup from showing to the same visitor multiple times?
In your ConvertForce campaign settings, set the display frequency to “Once per session” and the “When closed” behavior to “Hide forever.” This shows the popup to new visitors once and prevents it from reappearing after they dismiss it.