How to Create a Custom Mailchimp Signup Form in WordPress


Want to add a Mailchimp signup form to WordPress without wrestling with HTML code? You’re in the right place!
There are a few ways to do it. You can use Mailchimp’s official WordPress plugin, copy and embed custom HTML, or take the easier route with a WordPress form builder.
If you want more control over how your signup form looks and what information it collects, ARForms makes this whole thing a lot easier. You can design your own custom Mailchimp signup form with just a simple drag and drop. Also, you get to customize the fields and styling, connect it to Mailchimp and add it to your WordPress site with zero hassle.
The best part is you don’t have to create the form from scratch.
Let’s see how to create a custom Mailchimp signup form in WordPress with ARForms.
Why Create a Custom Mailchimp Signup Form in WordPress?
Creating a custom Mailchimp signup form in WordPress gives you complete control over how you collect email addresses. Although the default Mailchimp forms can get the job done, they are mostly rigid…or just mismatched with your website’s taste.
A custom Mailchimp form for WordPress bridges this gap between basic data collection and a professional user experience.
Here’s more to why making the switch is a smart move for your WordPress site:
Total Design Freedom
Default Mailchimp forms look like they’re made in 2012 – rarely matching your website’s aesthetic. The custom forms, on the other hand, solve this visual mismatch with ease. You can:
- Get rid of the Mailchimp branding
- Create responsive designs
- Customize fonts, colors and button styles
- Control layout options
Higher Conversion Rates
Generic forms get ignored but custom Mailchimp signup forms grab attention and convert passive visitors into active subscribers right away. You can:
- Put forms in popups, sidebars or headers
- Use behavior triggers
- Deploy exit-intent forms
- Lower form friction
Smart Data Collection
Custom Mailchimp forms lets you organize your audience automatically behind the scenes. You can:
- Enable hidden fields
- Automate audience segmentations
- Label users with smart tagging
- Group users by their exact interests or locations
Advanced Technical Control
Custom signup forms unlock powerful features that default Mailchimp forms simply never can. Thus by creating a custom Mailchimp signup form using a WordPress form builder plugin, you can:
- Link forms to your CRM or analytics tools
- Add invisible reCAPTCHA
- No code design
- Create smart interactive forms with conditional logic
How to Create a Mailchimp Signup Form For WordPress Site
Just follow the step-by-step tutorial below to embed a custom Mailchimp signup form on your WordPress site.
1. Get Mailchimp Ready for Your WordPress Signup Form
First things first, you’ll need to get a few things ready in your Mailchimp account before jumping on to the form creation part. And it’s not a code hassle.
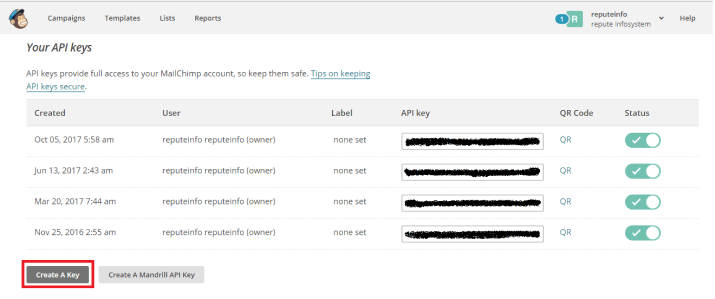
Simply log in to your Mailchimp account and generate an API key. ARForms is gonna use this key to connect your Mailchimp account and fetch the subscriber lists you want to use with your form (We’ll discuss this in the next step)
To get your Mailchimp API key :
- Log in to your Mailchimp account.
- Click your profile icon and go to Account & Billing or Account.
- Open the Extras menu and select API Keys.
- Click Create A Key.
- Give your API key a recognizable name if prompted, and create it.
- Copy the API key and keep it somewhere safe. You’ll need it in the next step.
Moreover, you’ll also need a Mailchimp audience/list ready to receive your new subscribers. Just in case you haven’t created one yet, create your audience in Mailchimp now before connecting it to ARForms.
After your API key and subscriber list are ready, you can connect Mailchimp to ARForms with zero hoops.
2. Connect Your Mailchimp Account to ARForms
Now that Mailchimp is ready, it’s time to connect it to your WordPress site with it.
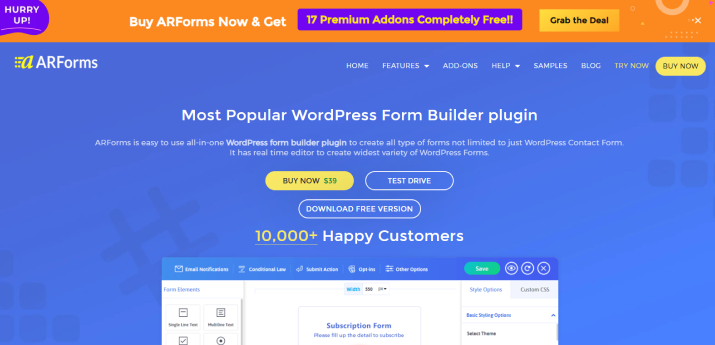
As we said before, ARForms, an well known WordPress form builder plugin, uses its Advanced Mailchimp integration to send the info collected through your signup form to your Mailchimp subscriber list.
Thus before setting up the connection, make sure the Advanced Mailchimp addon is installed and activated. You can activate it from ARForms → Addons.
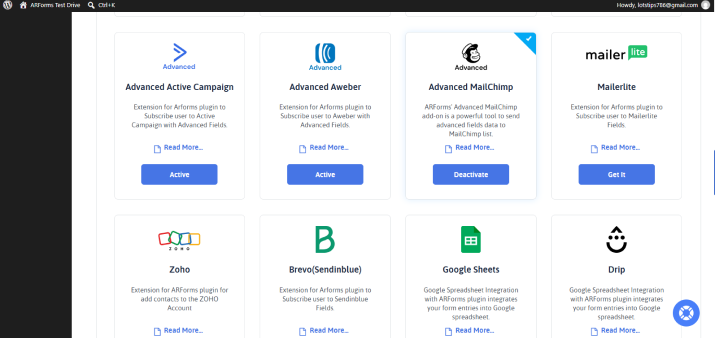
Once that’s done:
- Go to ARForms → Global Settings from your WordPress dashboard.
- Open the Email Marketing Tools tab.
- Find the MailChimp section.
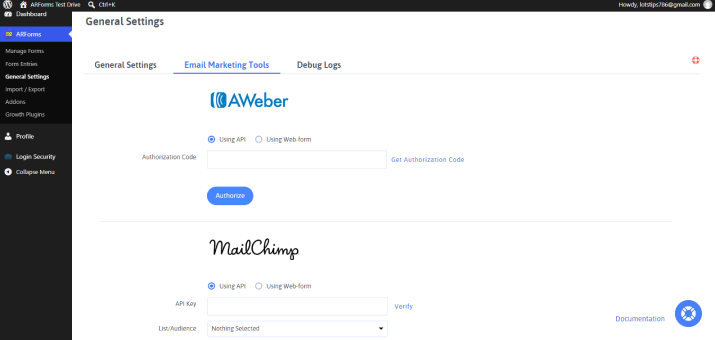
- Paste the API key you copied from Mailchimp.
- Click Verify.
- Once the connection is verified, your available Mailchimp subscriber lists will be loaded
- Select the list you want to use and save your settings.
That’s all! Your Mailchimp account is finally connected to ARForms WordPress form builder plugin. And you’re ready to create a custom Mailchimp signup form.
3. Create Your Custom Mailchimp Signup Form
Now comes the fun part -Creating your own Custom signup form!
Go to ARForms → Add New Form and pick how you want to start. You can either select a Blank Form and build your form from scratch or go with a Subscription Form template or sample form to get started faster.
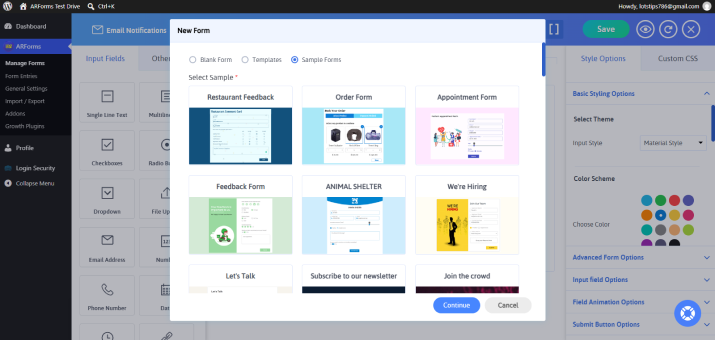
Worth mentioning ARForms comes with over 50+ sample forms and templates designed by professionals alongside extensive styling options for adding a touch of personalization.
For a simple Mailchimp signup form, you’ll usually only need a few fields such as:
- Email Address
- First Name
- Last Name
You can add other fields if you need more info from your subscribers. Just keep in mind that asking for too much info can make your signup form feel unnecessarily complicated. In other words, it may backfire.
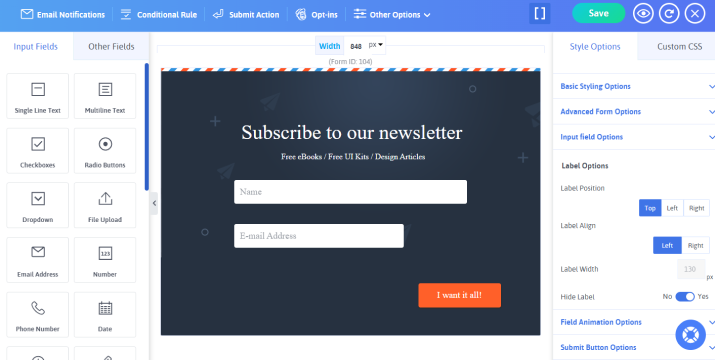
Lastly after you’ve added your fields, use the ARForms form builder to customize the form’s appearance. You can adjust the layout, field styling, colors, buttons and other design elements to make the form fit naturally with your WordPress site.
When your form looks the way you want, don’t forget to hit the save.
4. Choose Where Your Subscribers Go
Your form is ready, but you still need to tell ARForms where the information should go in Mailchimp.
Open your form in the ARForms editor and go to the Opt-ins section. Here enable Mailchimp to connect this particular form with your Mailchimp account.
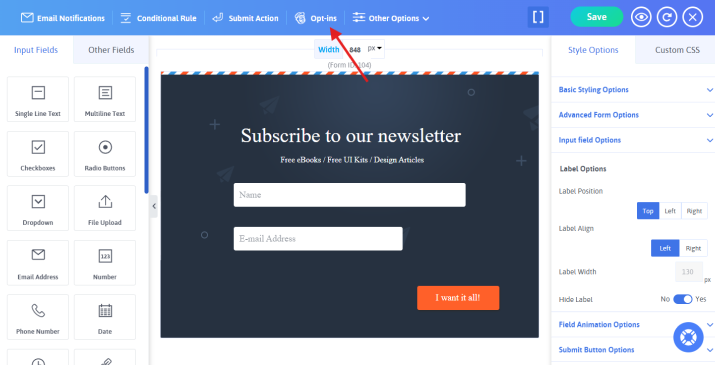
Next select the Mailchimp subscriber list you want to use. Then map your ARForms fields to the corresponding Mailchimp fields.
For example, you can do it like this:
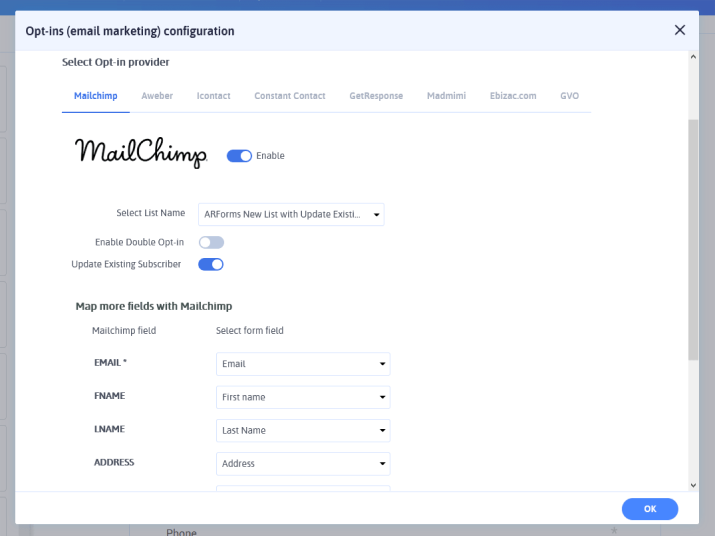
- ARForms Field → Mailchimp Field
- Email → EMAIL
- First Name → FNAME
- Last Name → LNAME
Just make sure you map all required Mailchimp fields before saving your form. And once the fields are mapped correctly, save your form.
5. Publish Your Mailchimp Signup Form in WordPress
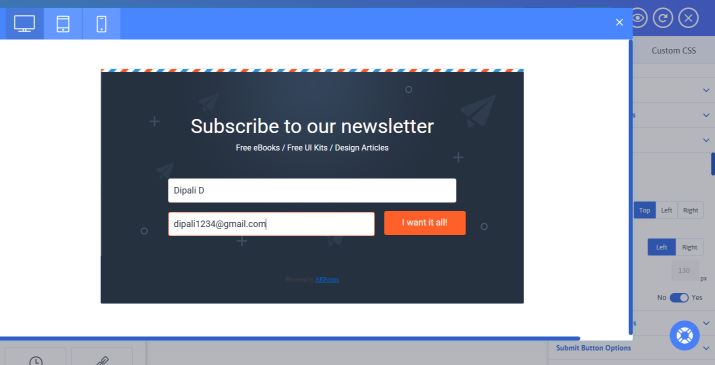
Congrats, your custom Mailchimp signup form is ready. Now it’s time to put it where your visitors can actually see it.
Create a new WordPress page or post or open an existing one where you want to display the form. Next, just simply use the ARForms block or available ARForms shortcode to show the signup form you just created.
You can choose the show style that works best for your website such as an embedded form or popup form by using different shortcodes available from Manage Forms.
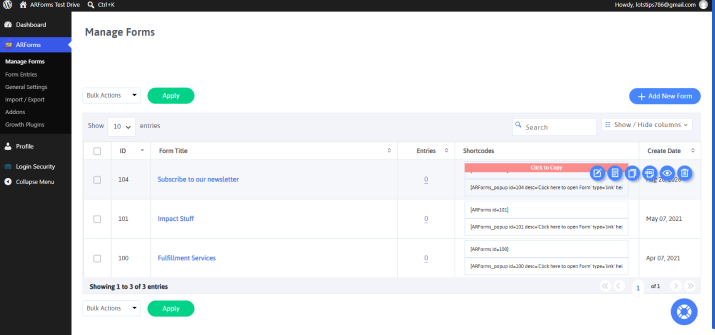
Once everything looks good, publish or update the page. Your Mailchimp signup form is now live on your WordPress site.
Tips for Creating an Effective Custom Mailchimp Signup Form
Creating the custom Mailchimp signup form is only half the job. You also have to make sure visitors actually want to fill it out. So a few small changes is all it takes to make your signup easier than others and more inviting.
Keep Your Form Short
Only ask for the details you really need. If you’re simply trying to grow your email list, an email address may be more than enough. You can always ask for more details later.
Make the Call to Action Clear
Tell visitors exactly what will happen when they submit the form. Never make the mistake of using a generic “Submit” button. Always try something more specific like “Subscribe Now,” “Join the Newsletter,” or “Get Updates.”
Match Your Website Design
Your signup form shouldn’t feel out of place on your website. Customize the colors, fonts, buttons and layout till it starts feeling like a natural part of your site experience.
Tell Visitors What They’ll Get
Give people a reason to subscribe. Doesn’t matter whether it’s useful tips, exclusive content, product updates or special offers, just make the benefit clear before they start filling in their email address.
Make It Easy to Find
A great signup form won’t help much if visitors can’t find it. Thus consider placing it in areas of your website where people can see it without even looking for it. Areas of your website such as blog post, sidebar, landing page or popup.
Test Your Form Before Going Live
Don’t forget to test the complete signup process. Make sure the form works properly, the details reach the correct Mailchimp list and the form looks good on smart phones as well.
Start Collecting Subscribers With Your Custom Mailchimp Signup Form
And….that’s all for today!
Got how to add Mailchimp signup form in WordPress? It’s easy with ARForms + Advanced Mailchimp integration addon. Connecting your Mailchimp account to designing your form, mapping your fields and publishing it on your website, ARForms takes care of everything.
The best part is that you don’t have to settle for a basic signup form anymore. ARForms is one of the most feature rich WordPress form builder plugins we’d recommend for creating an online form that fits your website’s taste and needs.
So no need to think twice. Make your custom Mailchimp signup form and start growing your email list today!
You may also like