Home > Front End Entries View
Front End Entries View
ARForms – Front-end View Entries addon is useful to allow your users to view/edit their submitted data from front-end. Users can View, Search and sort their form submissions.
Key Features
- Easy installation
- List View and Table View options
- View,Sort and Search From Form Entries at frontend
- Edit entries from the front end
- Approve & Reject Entries
- Notification Facility When Form Data Is Modify
- Easy Export To CSV File
- Ordering Data With Selected Form Fields
- Pagination For Data
- Manage to display Form Submissions only logged in users or public
- Allow To Display Only Approved Data
- LightBox Facility For Image Data
- 100% customizable – View Data With Different CSS Style As Per Requirements
- Multi-lingual
- Fast & Lightweight
Steps For Installation And Activation
You can install plugin either of these two methods.
- New install via FTP
- New install via the WordPress Uploader
a. Download the plugin from CodeCanyon, and extract it. You should find a directory arformsview.
b. In your WordPress installation, upload arformsview to wp-content/plugins/
c. Activate the ARForms - Front End Entries view add-on plugin through the Plugins menu from WordPress admin panel.
a. Download the plugin from CodeCanyon
b. Log in to your WordPress admin panel
c. go to Plugins -> Add New -> Upload
d. Click on choose file and browse the download package from CodeCanyon. When the plugin uploads successfully, click on Activate Plugin.
After activating the plugin, you will be able to see the Front End View Entries link under the ARForms menu in the admin menu list.
Front-end View Configuration
You can configure existing forms with Front-end Entry View from this page. You can get list of all forms which are already configured with Front-end Entry View from this page.
You can edit existing form’s Front-end Entry View configuration by clicking on "Edit Configuration" icon. You can view total entries of any specific form from list. Or if you want to delete configuration for any form, just click on "Delete" icon.
You can configure new form by clicking on "Configure New Form" button from top right corner
You can configure your existing form with Front-end Entry View from this page. You can select the form from dropdown with form list.
You can configure Table View as well as List View.
- Table View : This type will display all form data in Tabular format.
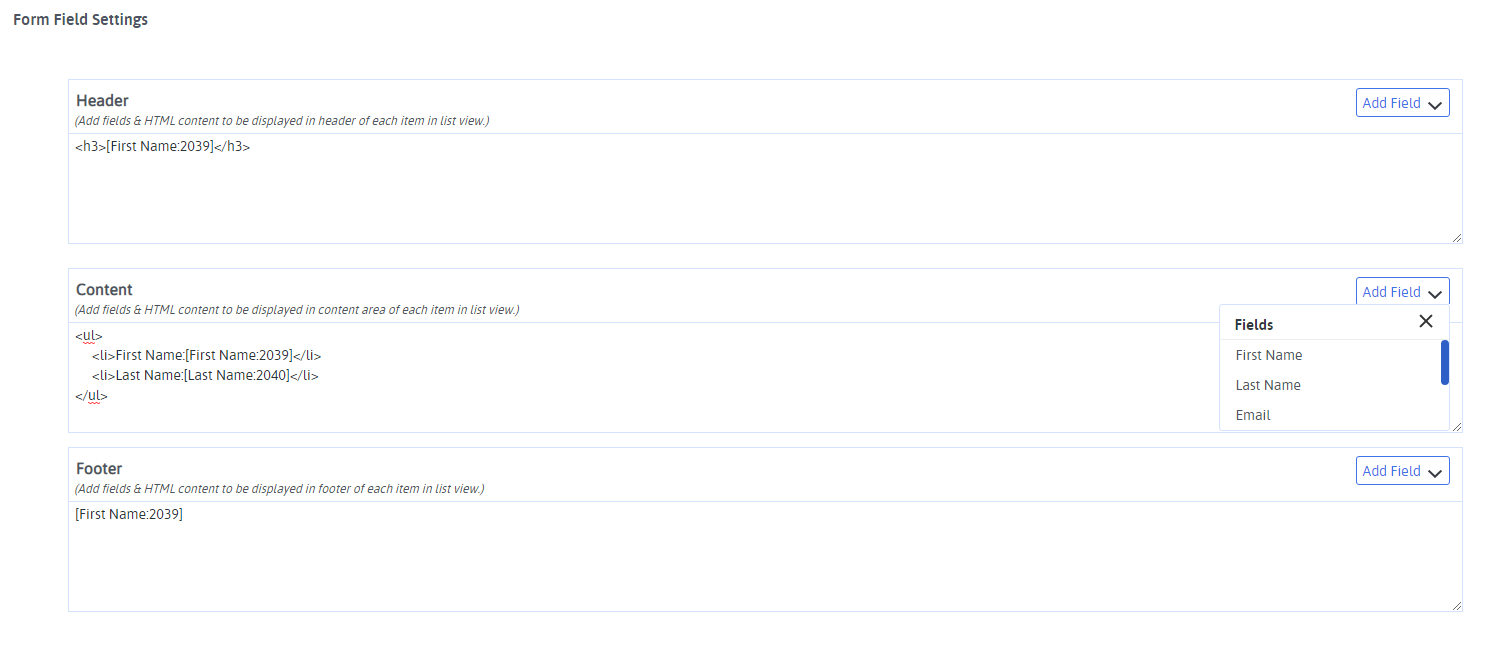
- List View : This type will display all form data in Descriptive format. You can use your own HTML inside the given textareas.
View settings
- For table view, you can select the form fields to display the table. You can also manage the field order by drag and drop the fields.
-
Note: Following fields will not be displayed in the tabular view or list view.
- Section ( Fields placed inside the section will be displayed )
- Page Break
- HTML
- Repeater
- Credit Card Fields Except Card Holder Name
- Captcha
- Hidden Fields
- All Fields placed inside the Repeater Fields
-
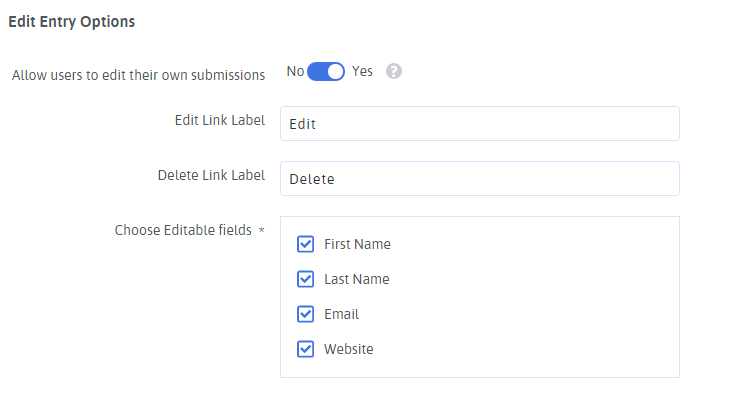
Edit Field settings: To allow editing and deleting, you can enable this option. Where you can select the edit link label as well as select the fields for editing. When you enable this setting, an Edit & Delete link will be displayed in the view where user can either edit or delete the entry.
Note: Following fields will not be available for edit
- Section ( Fields placed inside the section will be available for edit )
- Page Break
- HTML
- Repeater
- Credit Card Fields Except Card Holder Name
- Captcha
- Hidden Fields
- File Upload
- Image Control
- All Fields placed inside the Repeater Fields
-
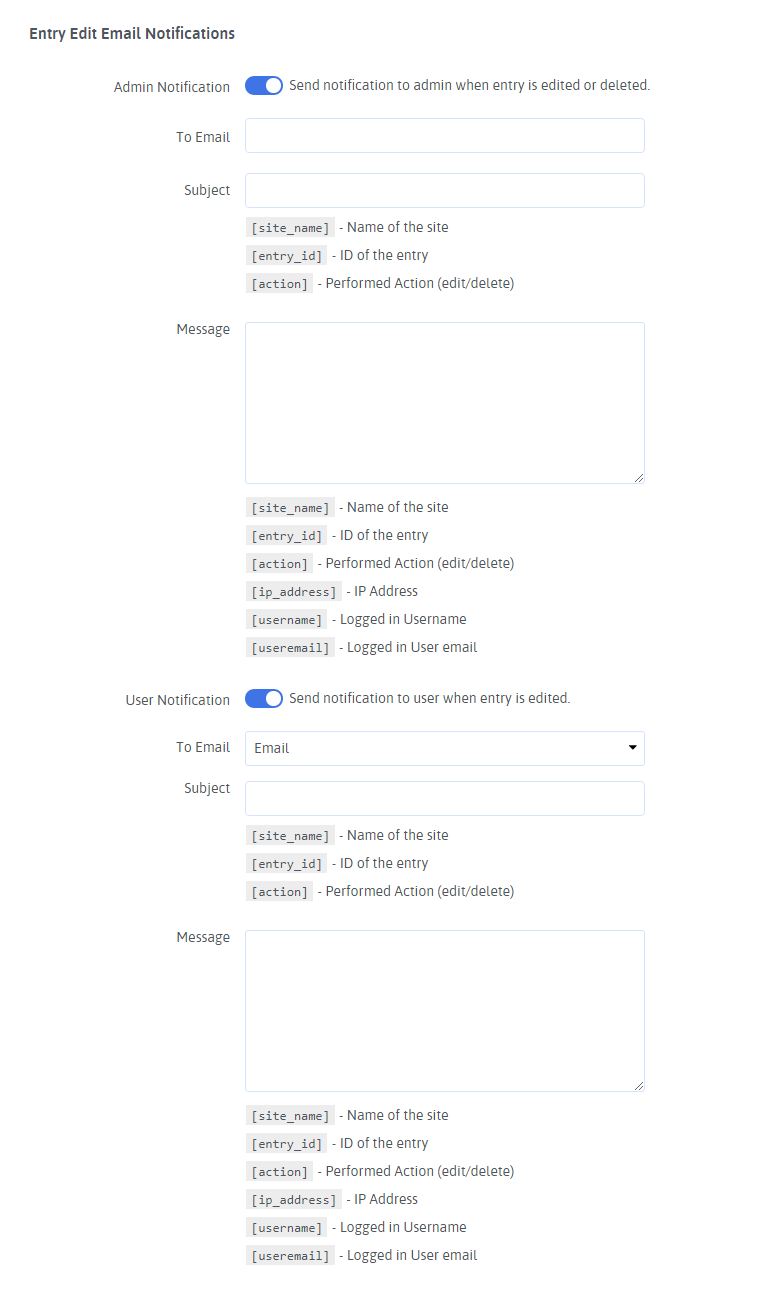
Email Notification: You can configure email notification for admin as well as user. You can enable the option to send ‘Email Notification’ for admin where you’ll find a field to set the email, subject and the email message. You can use multiple email address separated by comma to send the notification to multiple admin users.
Note: When this option is enabled, email will be sent to admin when an entry is edited or deleted from the view.
- To send email notification to user, you just need to enable the option for ‘User Notification’ and you can set the email field from the selected form where the email will be sent along with the subject and email message set for this option.
Note: User notification will be sent only when an entry is edited from the view.
- Default Order Setting: You can set the default order of the entry listing by the specific field. You can also set the default order format like Ascending & Descending.
- Search Setting: You can enable the search facility on the list and also select the fields from the list to allow the searching on specific columns only
- PDF Setting: You can display the View PDF link on the list after enable the view pdf option of PDF Setting. This setting is available only if the ARForms’ PDFCreator Addon is installed and activated.
- Pagination Settings: You can set the number of records to be displayed on a page. it can be helpful when you’ve large amount of data.
Other Settings :
-
Display Entries to Public :
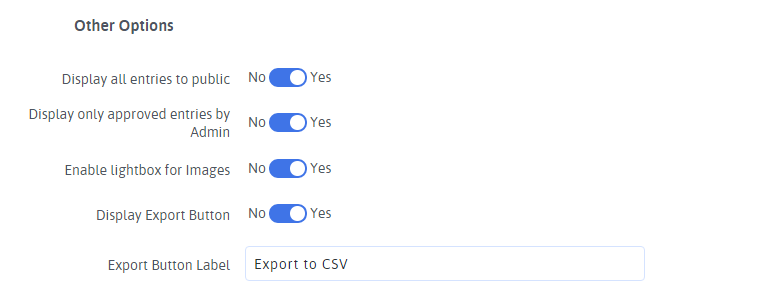
This option will allow entries to be displayed publically. User don’t need to logged-in on your website.
Note: If the edit entry is enabled and the view is set to public, then only logged in users can edit/delete their specific entry. Other entries will not be editable by the users. Admin user can’t edit/delete the entries from the front-end. Admin user can only view the entries.
If this option is disabled, then only logged-in users can see the entries. Also only those entries will be displayed which are submitted by the user him/herself. Administrator can view all entries.
-
Display Only Approved Entries :
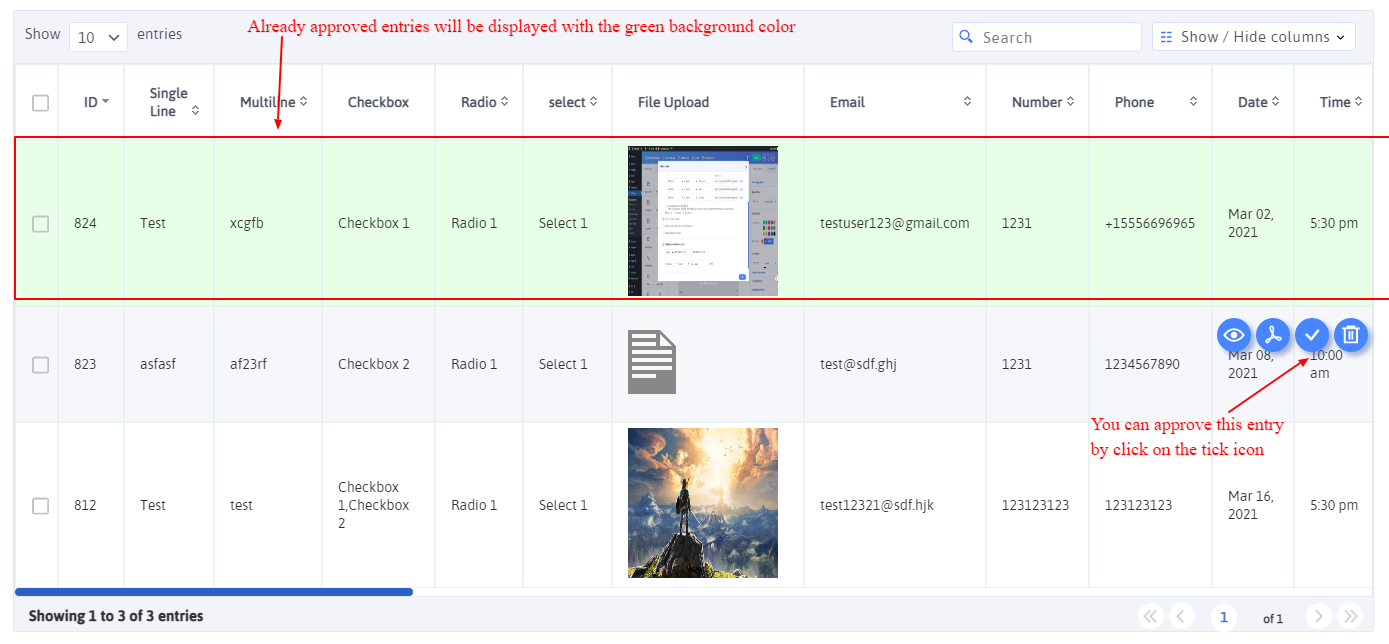
This option will display only approved entries in the view. When you enable this option, an extra button will be enabled in the ARForms > Form Entries section for that particular form which is mapped with the view add-on. Where admin can approve/disapprove the entries. Approved entries will be displayed with the light green background in the row.
- Enable Lightbox for Images :This option provide lightbox functionality for image field data. It will open image in new lightbox modal popup when user clicks on image.
-
Enable Export Button : You can enable the ‘Export to CSV’ button for the view, so that visitors can export the entries data in the CSV format.
Note: Please note that only those entries will be exported those are visible in the view. If you search the entries and export them, then only search result data will be exported.
You can change the export button label from the given textbox
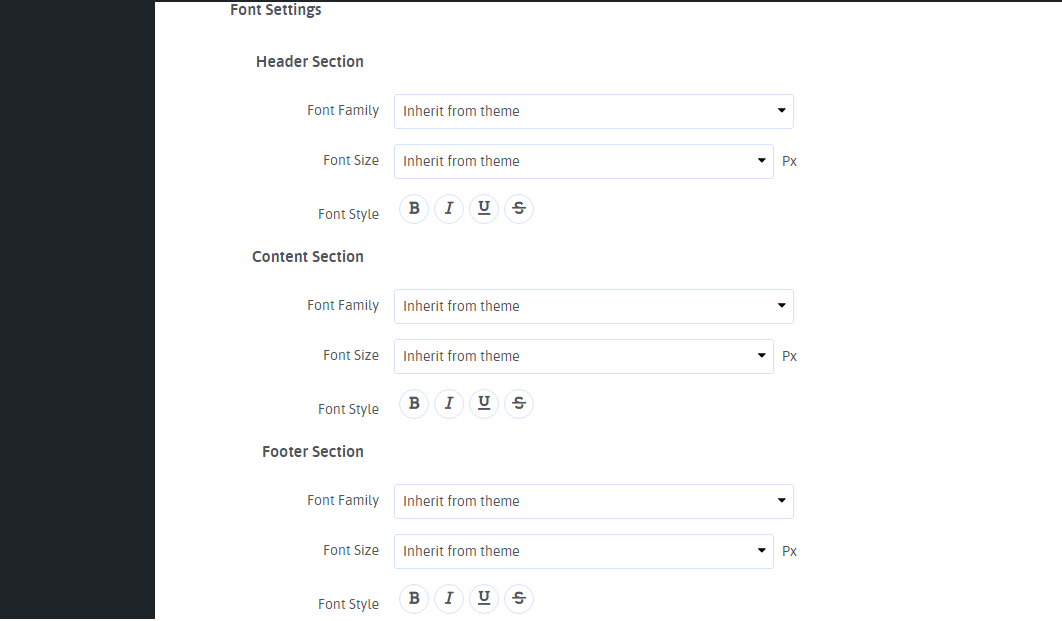
- Font Settings ARForms Entry View Add-on provides the facility to customize the font settings. By Default, all set to ‘Inherit from theme’ so the font styling will be matched with the theme. You can also select the Google Fonts to customize the font family.
-
Color Settings
Here, you can set the colors of the tabular view as well as the list view.
- For tabular view, you can customize background and text color for header, background color for odd and even rows and text color for rows, and footer background and text color.
- For List view, you can only change the text color for header, content, and footer.
Button background and text color can be customized in both table and list view.
-
Custom CSS
If you feel to change the styling further, then you can write your own custom CSS code to style the sections. The following are the class selector list of the table and list view.
Table View Selectors.arf_table_view_wrapper– class selector for the table view wrapper.arf_view_header_styles– class selector for the header cells.arf_view_entry_row– class selector for the entry rows. You can use.arf_view_entry_row tdto target the each cells of the row..arf_table_view_paginate_link_wrapper– class selector for the pagination wrapper div. You can use.arf_table_view_paginate_link_wrapper ato target the pagination link and.arf_table_view_paginate_link_wrapper spanto target the current page.
List View Selectors.arf_list_view_wrapper– class selector for the list view wrapper.arf_list_view_entry_wrapper– class selector for the wrapper of the single entry in the listing..arf_list_view_title_wrapper– class selector for the wrapper of the header section of the list.arf_list_title_data– class selector applied to the each field value placed inside the title section.arf_list_view_content_wrapper– class selector for the wrapper of the middle content section of the list.arf_list_view_footer_wrapper– class selector for the wrapper of the footer content section of the list.arf_list_content_data– class selector applied to the each field value placed inside the content and footer section section
.arf_view_toolbar_wrapper– class selector for the wrapper of the search and export button..arf_search_container– class selector for the wrapper of the search box. You can target the input by using.arf_search_container input.arf_search_btn– class selector for the search button.arf_export_entries_btn– class selector for the export to csv button
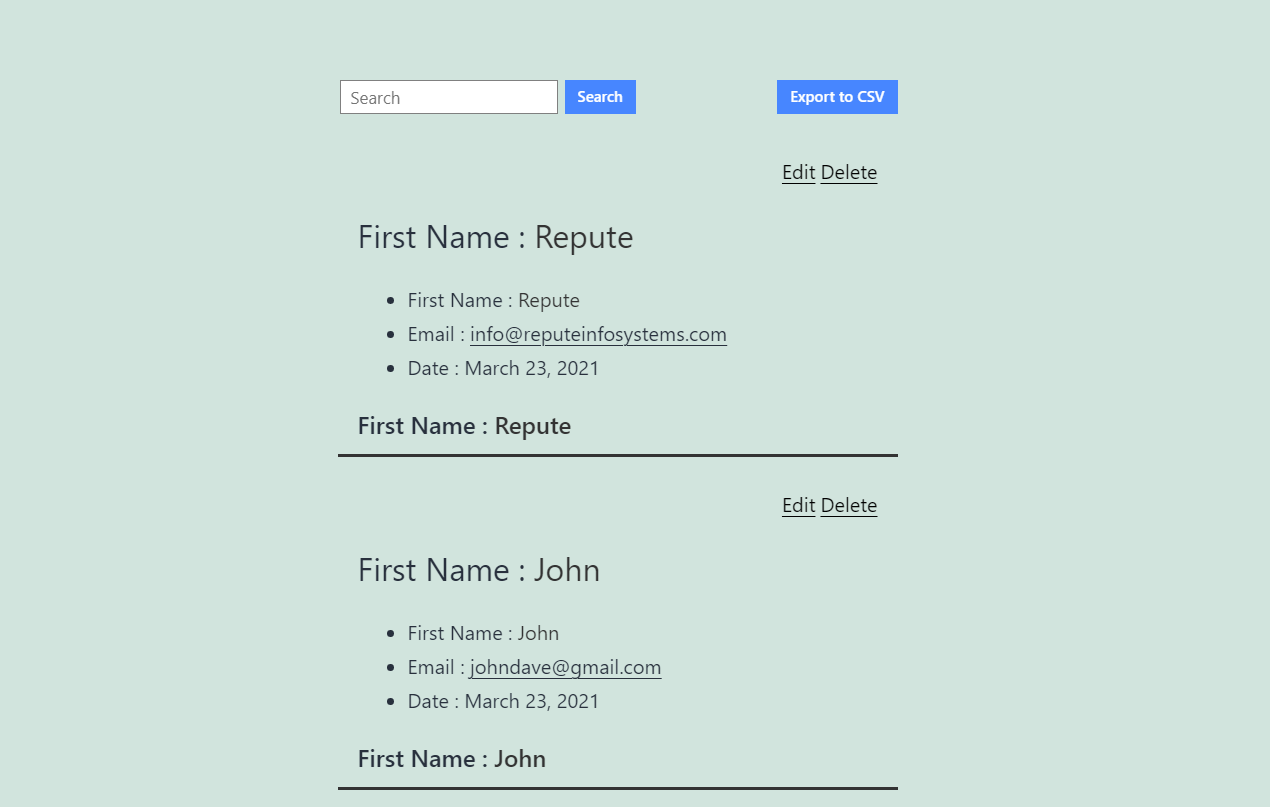
Front Page Display
Important points to take note:
- If the form is mapped with Front-end Entry view addon and with the other payment gateway Add-ons of ARForms, the edit entry will only update the entry data. No payment will be charged and nothing will happen to the original payment data.
- If the form is mapped with Front-end Entry view addon and with the Email Marketers Add-ons like ( Advanced Mailchimp, Advanced Aweber, etc) then it’ll not affect the subscription data on the respective Email Marketers.
- If the form is mapped with Front-end Entry view addon and with the user registration Add-on too, then it’ll only update the entry data when the user edits the entry from the front-end. The user profile will not be updated with Front-end Entry View Add-on.
- If the form is mapped with Front-end Entry View and with the Post Creator Add-on, then there will be an option to choose whether to update the existing post or not. This feature will only work from Post Creator Add-on version 1.8. Also, only those posts/pages/custom posts will be updated that are created from Post Creator Add-on version 1.8. Earlier posts will not be updated using this option.
Changelog
Version 1.5 (02 November, 2021)
- Minor bug fixes
Version 1.4 (25 October, 2021)
- Added compatibility with ARForms version 5.5
- Minor bug fixes
Version 1.3 (25 August, 2021)
- Added compatibility with ARForms version 5.5
- Added facility to enable ‘PDF’ link to view PDF from the front-end view entries when the ARForms – PDFCreator add-on is active.
- Minor bug fixes
Version 1.2 (07 June, 2021)
- Minor bug fixes
Version 1.1 (25 May, 2021)
- Added compatibility for ARForms Version 5.0
- Minor bug fixes

