Home > Mollie
Mollie
ARForms has a new extension that accepts payment via the standard Mollie method. ARForms Mollie is just another WordPress plugin that you can install and manage just like other WordPress plugins.
ARForms Mollie plugin integrates your form entries and payment in a single process. You can send users to Mollie with Dynamic amount directly after form submission from ARForms.
ARForms – Mollie Addon Key Features
- Multiple currencies
- Configuration for Mollie page
- Dynamic Return URL
- Easy installation
- Dynamic Pricing
- Fast & Lightweight
- Sandbox Facility
- Multiple Payment Method Selection Conditionally ( Product/Service and Subscription together )
- Conditional Payment – Send to Mollie only after defined condition becomes true
- Transaction Notifications
- View and Search Transactions
- Multi-lingual
Steps For Installation And Activation
You can install plugin either of these two methods.
- New install via FTP
- New install via the WordPress Uploader
a. Download the plugin from CodeCanyon, and extract it. You should find a directory arformsmollie.
b. In your WordPress installation, upload arformsmollie to wp-content/plugins/
c. Activate the "ARForms - Mollie Addon" plugin through the Plugins menu from WordPress admin panel.
a. Download the plugin from CodeCanyon
b. Log in to your WordPress admin panel
c. go to Plugins -> Add New -> Upload
d. Click on choose file and browse the download package from CodeCanyon. When the plugin uploads successfully, click on Activate Plugin.
After activating the plugin, you will be able to see the Mollie Configuration link under the ARForms menu in the admin menu list.
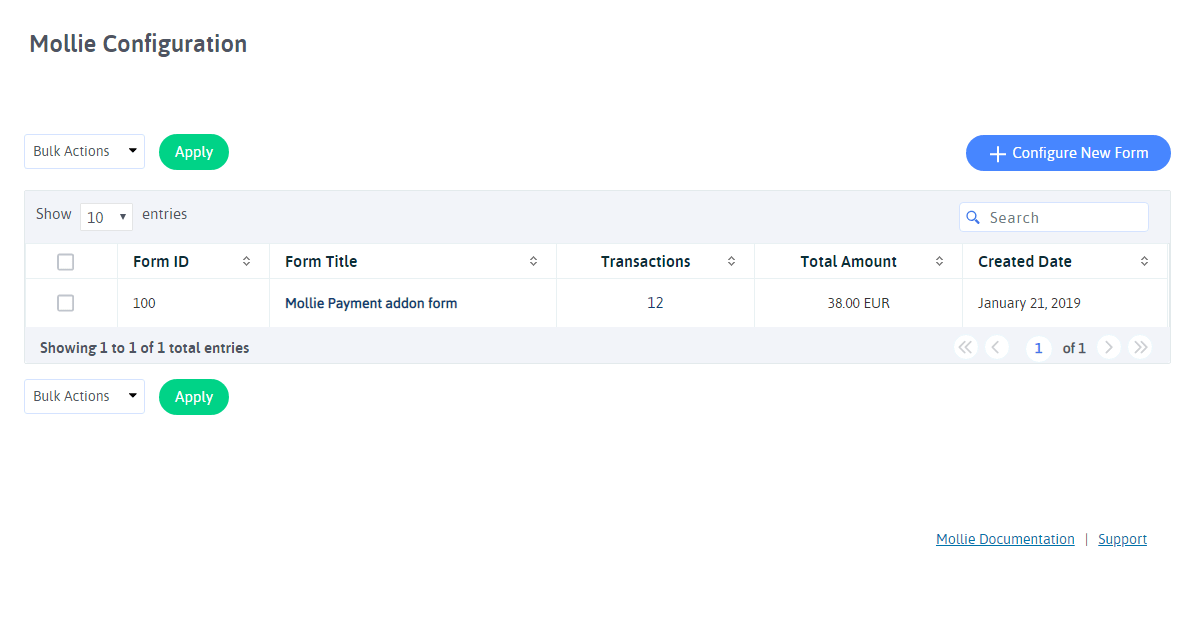
Mollie Configuration
You can configure existing forms with Mollie from this page. You can get a list of all forms which are already configured with Mollie from this page.
You can get form list along with Total transactions from this form, Total Amount of all successful transactions, etc.
You can edit the Mollie configuration for existing forms by clicking on the Edit Configuration icon. You can view all transactions of any specific form by clicking on Transaction icon from the list, and if you want to delete the configuration for any form, just click on Delete icon.
You can configure a new form by clicking on Configure New Form button from the top right corner.

You can configure your existing form with Mollie from this page. You can select form from the dropdown with the form list. You need to provide your Mollie API KEY and select Payment mode from this page. Select Test Mode to check transactions with sandbox mode.
Multiple Payment Type Configuration
You can configure Multiple Payment Type as well.
1) Product / Service: This Payment type will accept all product/service type payment.
2) Subscription: This Payment type will accept payment on a predefined recurring basis. You can decide the Billing Cycle and the Total number of occurrences. You can also place trial transactions.
- Conditional Payment Type (Product/Service and Subscription Together)
- Multiple Currency Support
- Dynamic Amount
- Payment Success Redirection
You can set multiple payment methods together conditionally. That means, If you want to accept payment through Product/Service as well as Subscription, you can set a condition for that and based on user selection, You can accept payment.
If you want to accept payment without any condition, Select Single Payment option and configure Product / Service Or Subscription Payment method.
If you want to accept payment conditionally for Product/Service and Subscription, Select Multiple / Combination payment and then set conditions for Product/Service and Subscription.
For example, If the user will select One Time Payment from the form, then accept payment through Product/Service and set Amount field there, And if the user will select Recurring Payment than accept payment through Subscription.
If you want to accept subscription payment, then you have to switch ON “Collect Customer Info” and configure at least customer email and name fields because its compulsory by Mollie payment gateway to create a customer profile for a subscription payment.
You can set multiple conditions for the subscription payment method.
If you have multiple Options for Subscription Conditions, and you want to accept payment based on the user-selected plan, you can set conditions there.
For example, If the user will select Monthly Subscription, Than set condition according to that. Accept payment through Subscription “XXX” if field “XXX” has Value “XXX” and likewise.
You can get more ideas regarding multiple Payment Method conditions from the above image.
Please visit Mollie API to get detail on how to get the API KEY.
ARForms Mollie plugin supports multiple currencies. You can get all transactions in your native currency.
You can set a dynamic amount with ARForms Mollie plugin. You can map the Amount field with the form field. When the user will fill that form and enter a value in the select Amount field, the plugin will set amount with Mollie Amount field. This is how you will set a dynamic price with Mollie.
The important thing you can manage is Return Action after the transaction. You can set what action should be performed after the transaction is made. You can select an option like to display a success message or display content from another page or redirect users to the external URL.
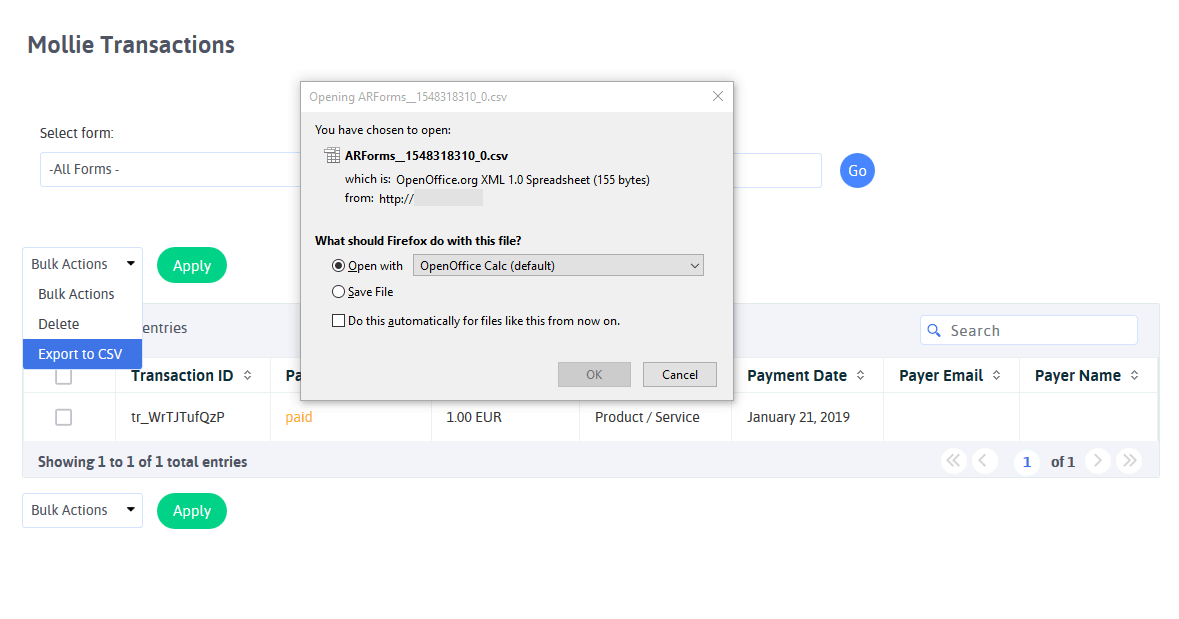
Mollie Transactions
After activating the plugin, you will be able to see Mollie Transactions link under the ARForms menu in the admin menu list.
You will see all Mollie transactions from this page. You can view all transactions from all forms or you can select already configured form from the dropdown of form list.
You can see Transaction ID, Payment Status, Payment Type, Total Amount, Payment type, Payer Email, Payer Name of the transaction, Transaction Date for all transactions.
You can filter transactions by selecting the date range. That means you can filter transactions base on the selected time periods. The default it will show all transactions within the system.

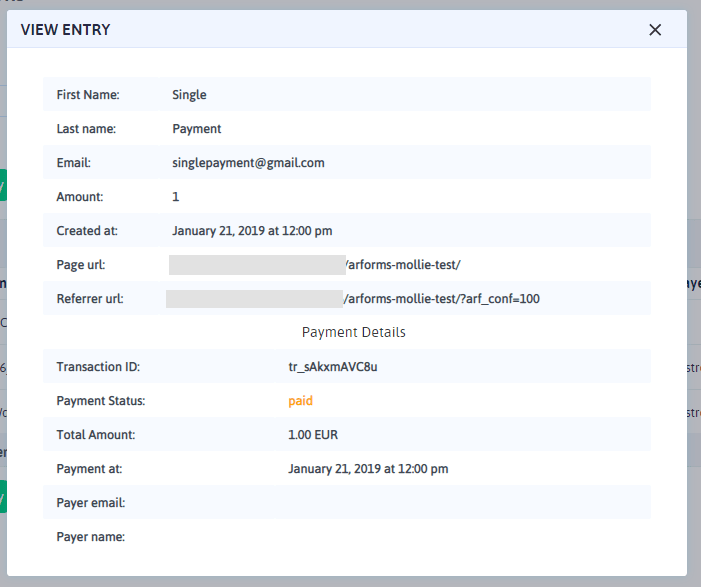
You can view complete transaction detail by clicking on View icon from the list. You will get complete details of form entry data and Mollie transaction detail. You can see at below screenshot.
You can delete the transaction by clicking on the Delete icon from the list. Please note that by deleting transactions you will not lose form entry data. You are deleting just Mollie transaction for that form entry from here.
Export Transactions
Now, with ARForms Mollie, you can manage Mollie transactions even better. You can download your Mollie Transactions into CSV format and manage those transactions in your own way.
Mollie API Configuration
To get Mollie API KEY please follow the steps given below.
1) If you do not have a Mollie account then Create Mollie Account.
For more information about create accounts and create a web site on Mollie account Click here.
2) For API Key Login into your Mollie account and click on the setting page.
If you do not have a website profile then create a new web site profile.
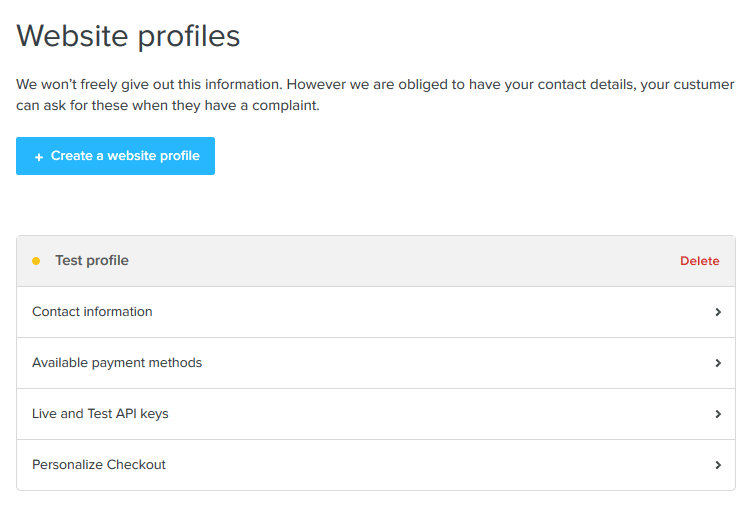
So in the website profile, you will see ‘Live and Test API Keys’ section.
3) Click on the ‘Live and Test API Keys’ section for API Keys.
The section looks like the below screen.
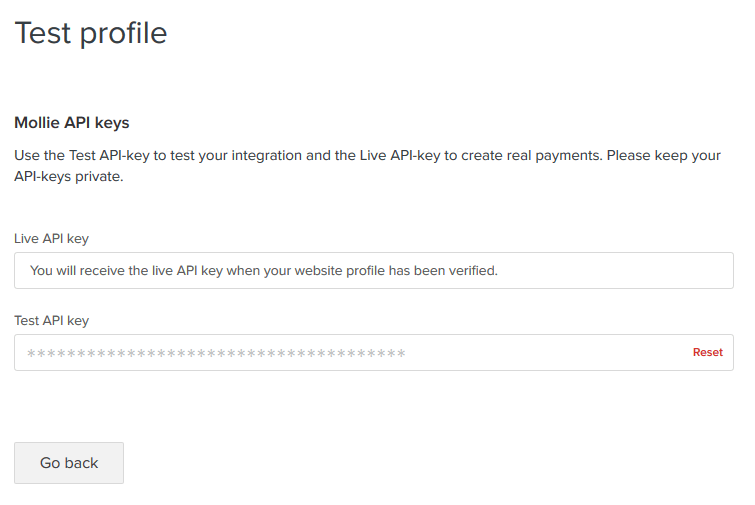
4) Mollie Mode wise Insert API key into Mollie API Key textbox.
Change log
Version 1.1 (03 January 2020)
- Added compatibility for ARForms version 4.0
- Minor bug fixes