Home > User Signup
User Signup
Creating a User within WordPress is now possible with ARForms.The User Signup Add-On for ARForms makes registering with WordPress so easy as never before.
Use the ARForms to allow users to register for your site and also edit their profile / Change their password / Retrieve their password from the front-end. User Signup For ARForms Add-on allows you to easily reference user meta and auto-populate forms with a logged-in user’s information. This Add-on comes with a complete user management solution.
Note: Please meet the minimum requirement of PHP version 5.6 and WordPress version 4.5
ARForms – User Signup Addon Key Features
- All in One User Management Solution
- Configuration for all user modules
- Seamless integration with WordPress user roles
- Custom User Roles Support
- Easy installation
- Register users only after receiving successful payment from ARForms Payment AddOns
- Fast & Lightweight
- Ability to Create / Register / Signup User
- Ability for User Login / Logout
- Ability to Change Password / Retrieve Forgot Password as well as Reset Forgotten Password
- Ability to update User Profile
- BuddyPress Profile Fields support
- Multi-lingual
- Supports Multi-Site environment
- Assign ARMember Plan to your user
Steps For Installation And Activation
-
- New install via FTP
a. Download the plugin from CodeCanyon, and extract it. You should find a directory arformsusersignup.
b. In your WordPress installation, upload arformsusersignup to wp-content/plugins/
c. Activate the "User Signup with ARForms" plugin through the Plugins menu from WordPress admin panel.
-
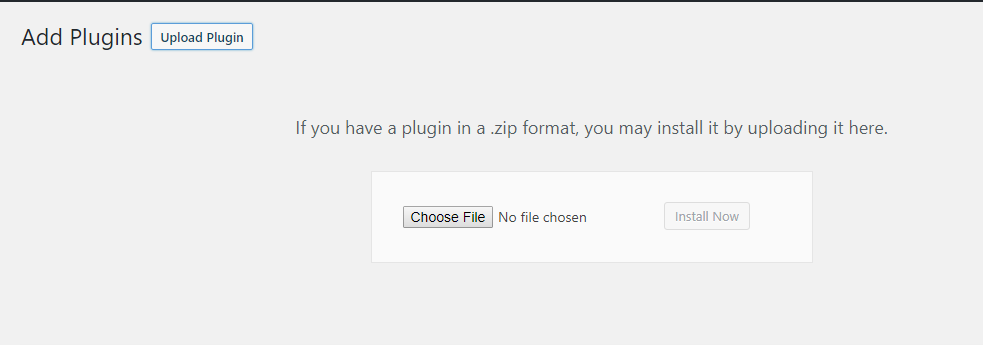
- New install via the WordPress Uploader
a. Download the plugin from CodeCanyon
b. Log in to your WordPress admin panel
c. go to Plugins -> Add New -> Upload
d. Click on choose file and browse the download package from CodeCanyon. When the plugin uploads successfully, click on Activate Plugin.
After activating the plugin, you will be able to see User Signup Configuration link under ARForms menu in admin menu list.
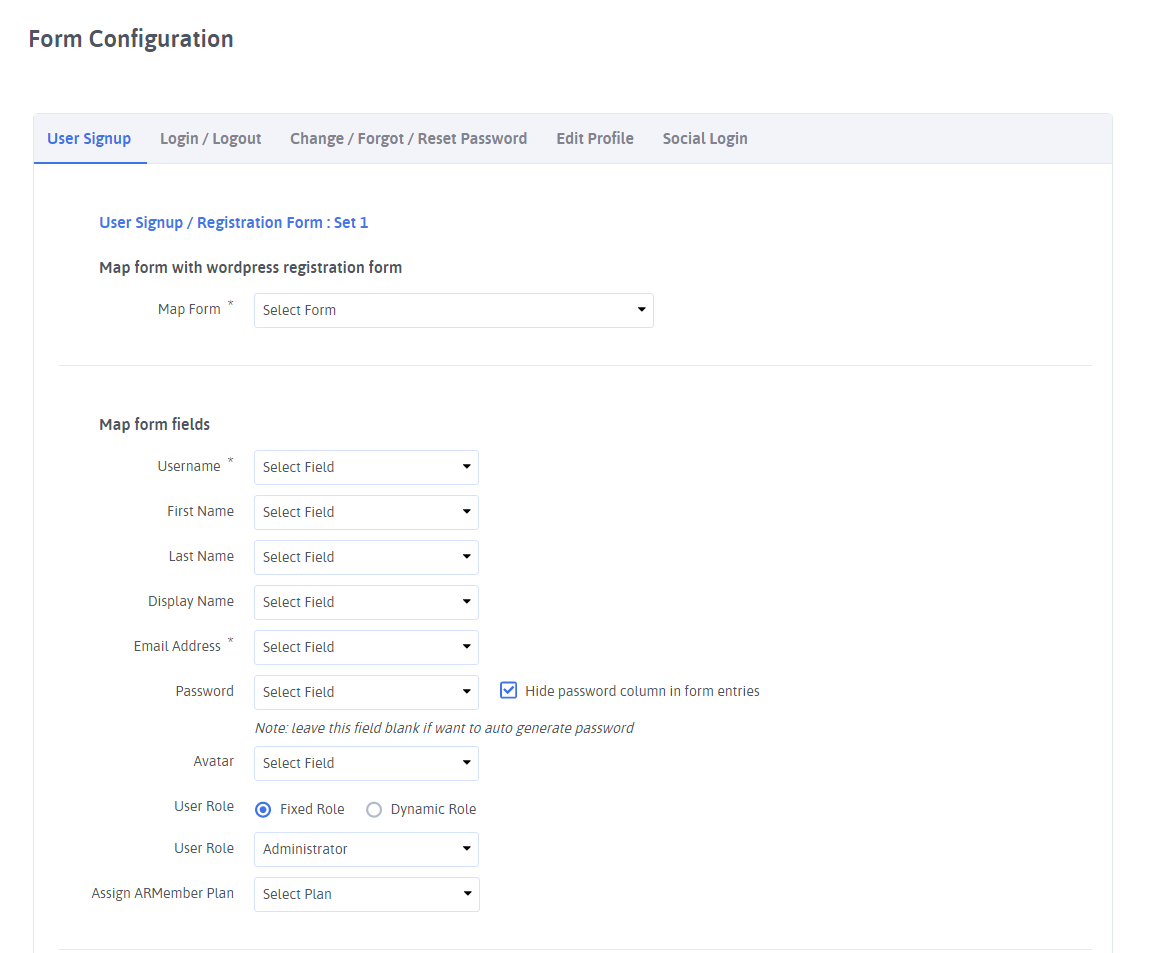
User Registration Configuration
User Signup For ARForms integrates your form entries and user registration seamlessly with your WordPress site. You need to just map your existing form with User signup configuration. and That’s it, it is ready to use. As you can see in the below screenshot, You can map default WordPress registration fields as well as you can set new user meta(s) for additional fields. You can map existing meta as well as you can add new user meta.
You can also send a notification to users after successful signup with your site. You can also allow your users to login automatically, immediately after successful signup.
ARMember Support
Now you can assign an ARMember plan to a specific user using Assign ARMember Plan dropdown. you can select a plan from the dropdown and it will assign to a newly created user.
Note: Assign ARMember Plan option will only work when ARMember WordPress Membership Plugin is Active.
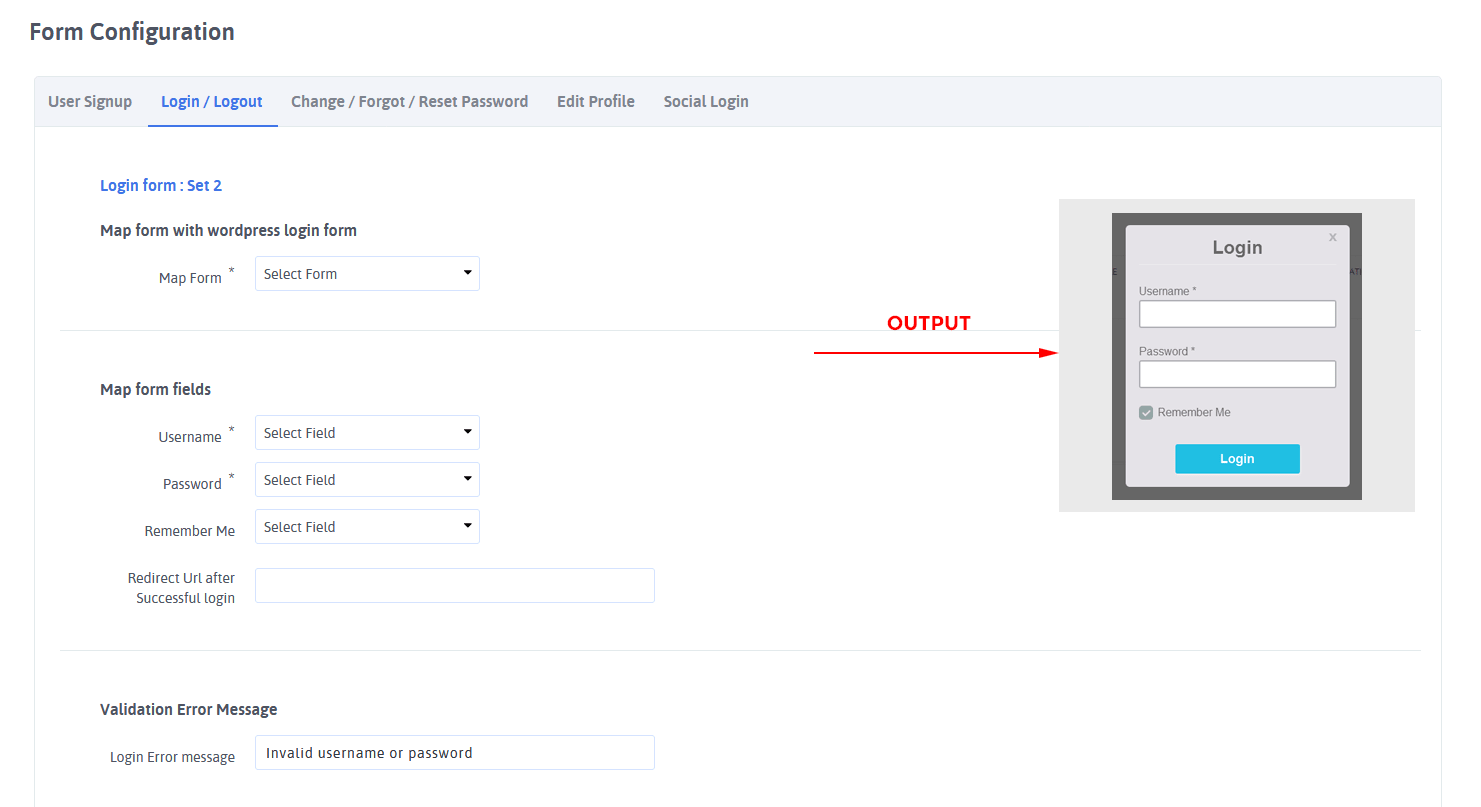
User Login Configuration
ARForms User Signup Add-on allows you to login user within your site only. For that, you can map existing ARforms’s form with this Add-on. Users will be logged-in to your site after submitting the form with correct credentials. You can also manage the redirection URL after successfully logged-in to your site. You can set your custom message for a invalid login attempt by the website user.
You can also map Remember Me option to allow your website users to remember users with your site.
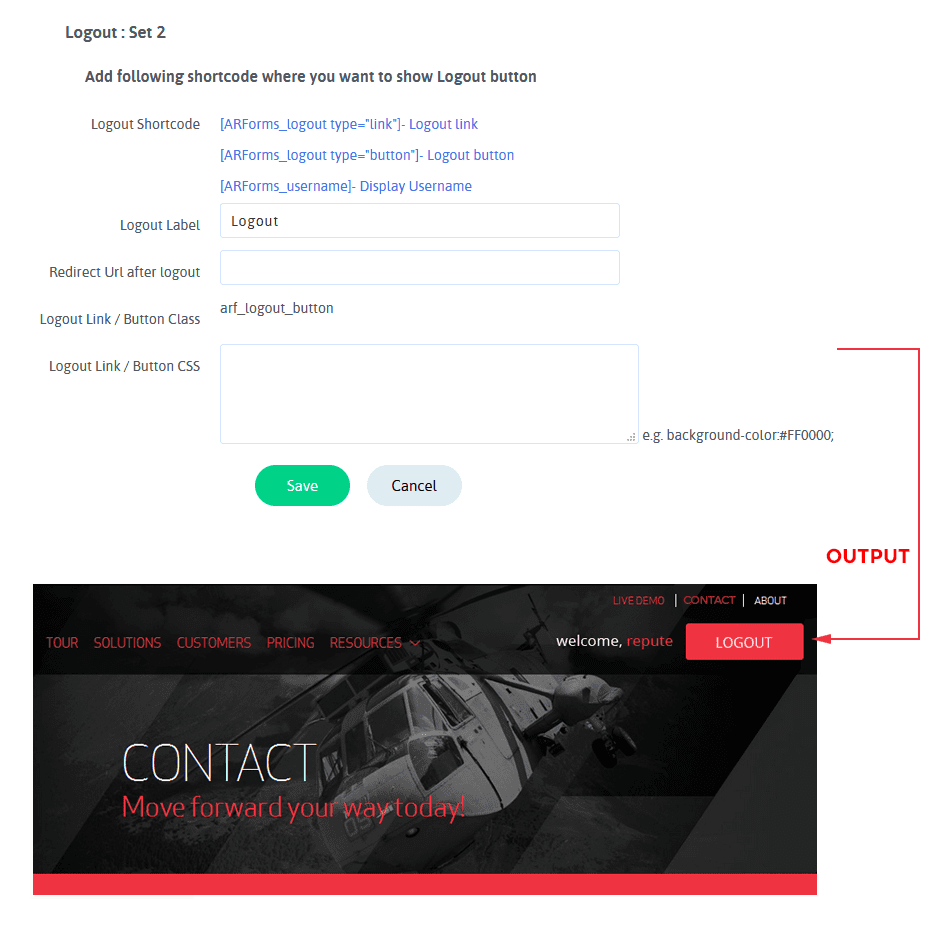
User Logout Configuration
You can put a link or Button for user logout. just place a shortcode from this add-on for logout. You do not need to manage anything else.
(Add below shortcode into post / page / widget)
1) [ARForms_logout type=”link”] – Logout link
2) [ARForms_logout type=”button”] – Logout button
If you want to change CSS of the logout button/link you can add CSS properties for arf_logout_button class. Or you can add your CSS properties into textarea which is given in the Logout configuration page.
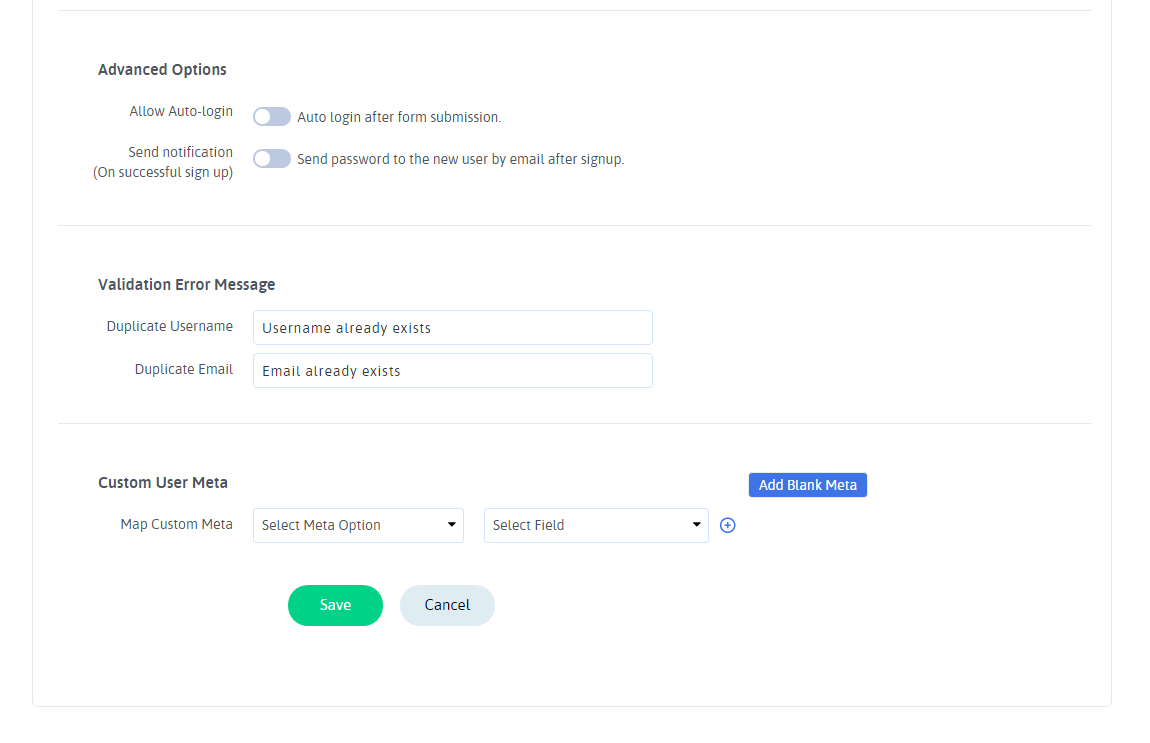
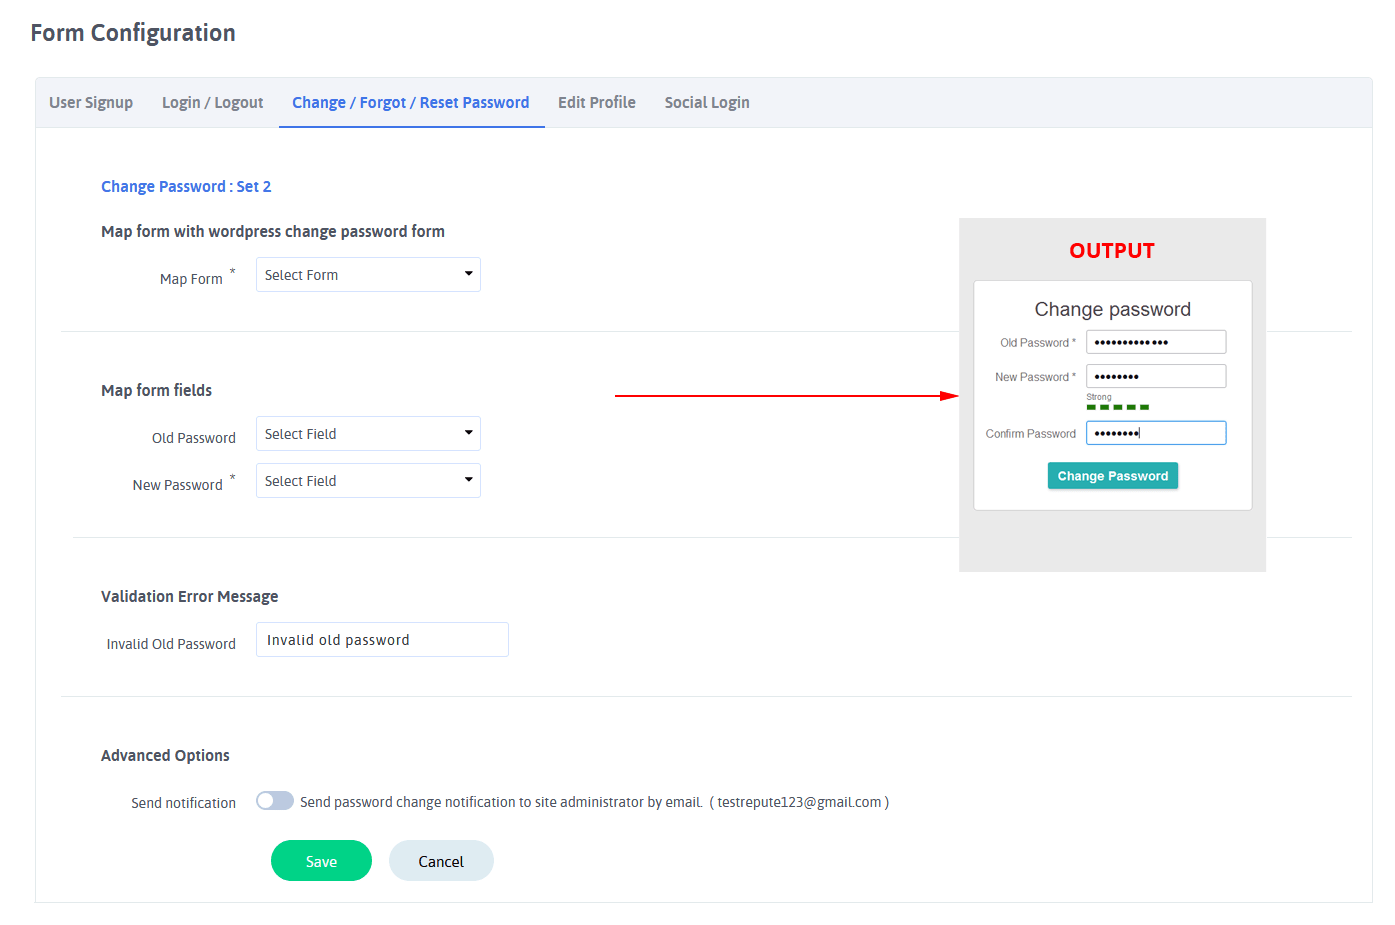
Change Password Configuration
ARForms User Signup Add-On allows your site users to change their password from the front-end. This add-on has the facility to validate the user’s old password before change the new password.
ARForms User Signup Add-On also allows sending notifications to site administrator while user changes their password from front-end.
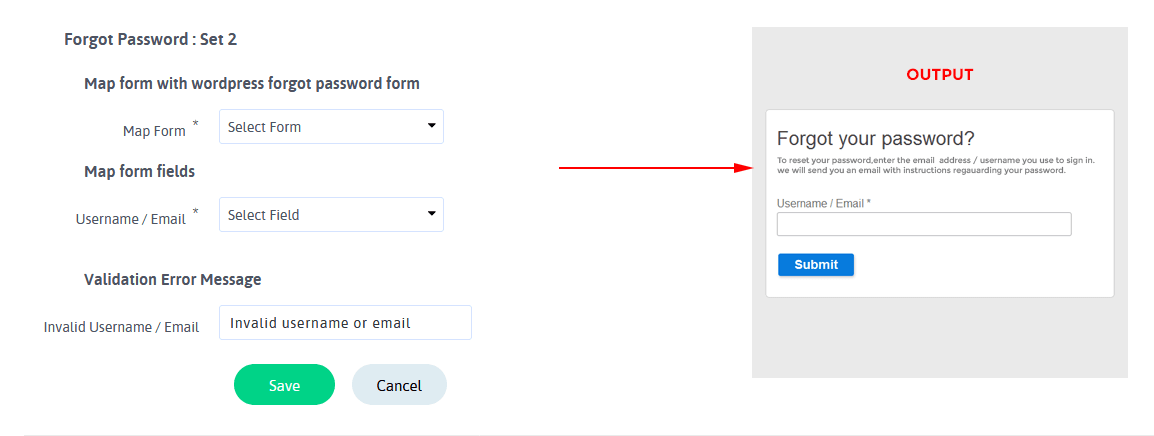
Forgot Password Configuration
With this add-on, your site users also can retrieve their forgotten password by entering their email or username from front-end. You can set your custom message in case of an invalid username or password found while retrieving their password.
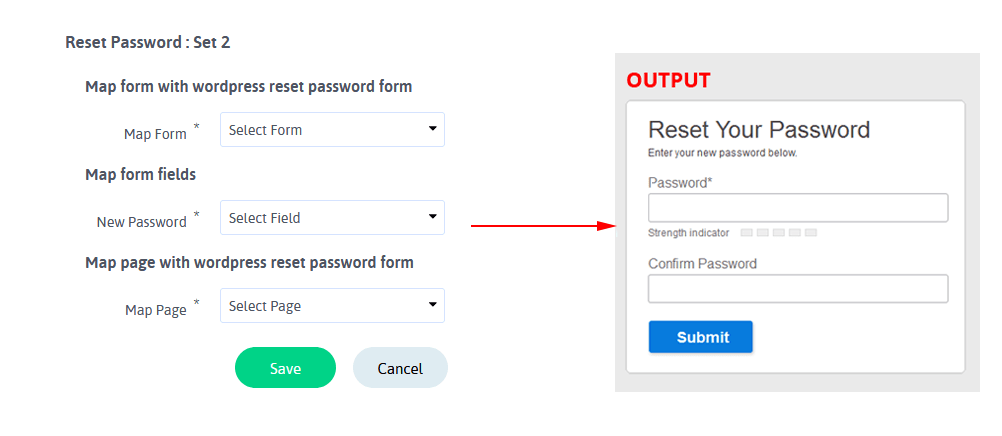
Reset Forgotton Password Configuration
With this add-on, your site users also can reset the forgotten password with ARForm’s form. You need to assign a Reset Password page where you have already set the Reset Password form.
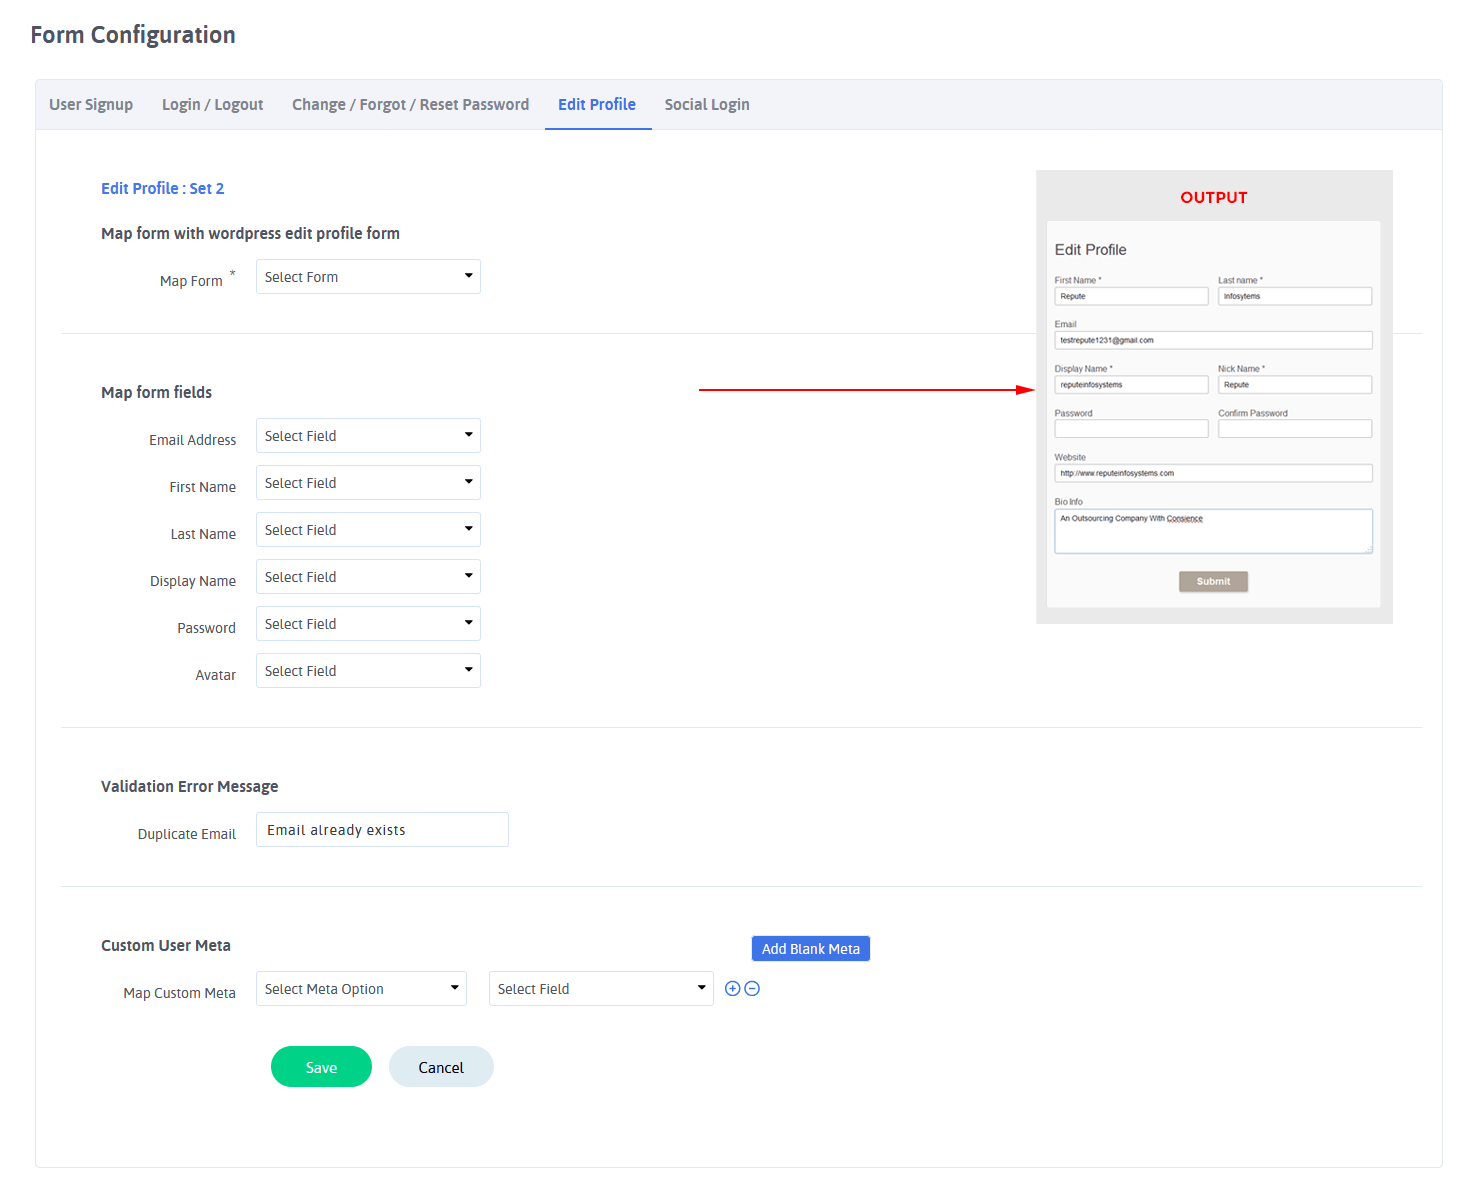
Edit Profile Configuration
ARForms User Signup Add-On allows your site users to edit their profile from the front-end. This add-on will auto-populate all the user’s data which he has entered while signup. Users can modify their profile data and update their profile immediately after submitting the form.
In the edit profile page, all fields will be pre-populated based on a logged-in user’s information
Social Login Configuration
ARForms User Signup Add-On let you allow your users to login by their social accounts on your site. Select options from Social Login configuration and enter respective API Details for which you want to enable social login.
Redirect URL
You need to enter redirect URL where you want your users to redirect after login with social accounts in your site.
Shortcode
You have given a shortcode here with your current set id, place this shortcode into post/page/widget from where the user can login into your site.
[ARForms_Social_Login set_id=1]
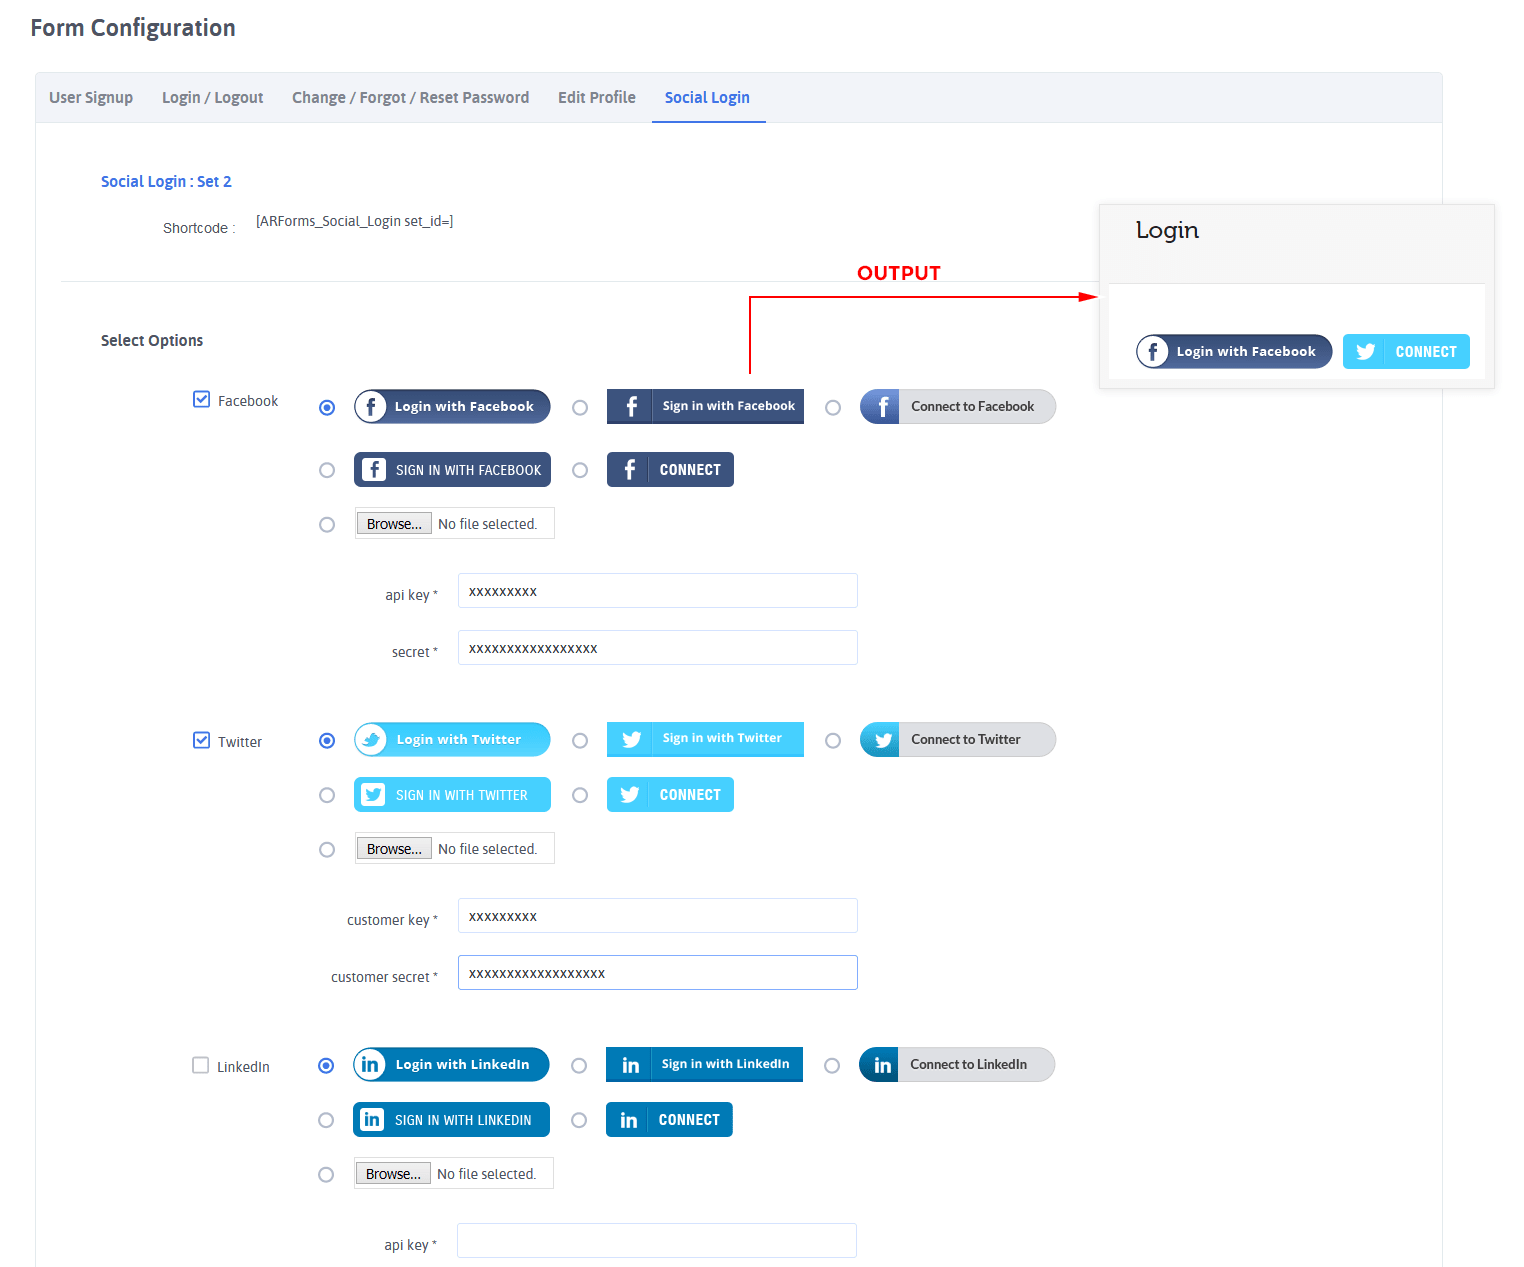
For each social network you need API Details to enable social login with. Please visit the individual social network configuration page at the social login configuration section to get more information to get API Detail.
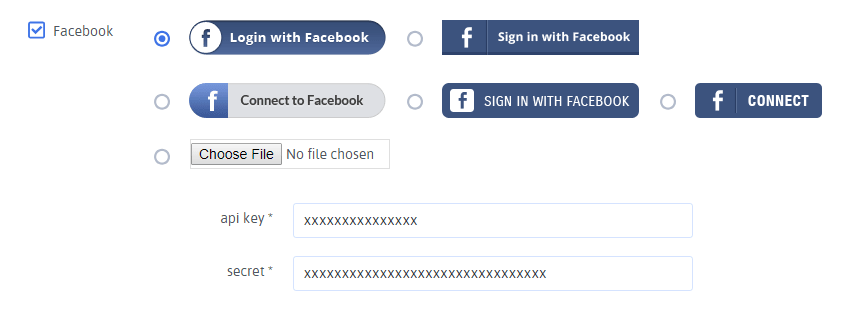
Facebook Configuration Steps
To enable Facebook Login using ARForms User Signup Add-on, you first need to configure Facebook App ID and App Secret under Facebook section.
To obtain the Facebook App ID and App Secret, you first need to create a Facebook Application.
Create Facebook App
1) To create Facebook App, Login to your account and click on this link.
2) To add your application please choose Apps from the header navigation and then select Add a New App.
3) Select the platform you want to add for your application.
4) Set Related App name and then select Create New Facebook App ID.
5) Set valid OAuth redirect URLs in your application. For that click on Products > Facebook Login > settings. Here enter your site URL in Valid OAuth redirect URL textbox.
6) Set No for Is this a test version of another app? and choose category for your Application and click on Create App ID.
7) Now you will have your new application details at your App’s Dashboard
8) Copy App ID and App Secret and set them in Social Login for Facebook in User Signup Add-On of ARForms
9) Save the settings and you can use the above shortcode in any page/post to display Login with Facebook Button.
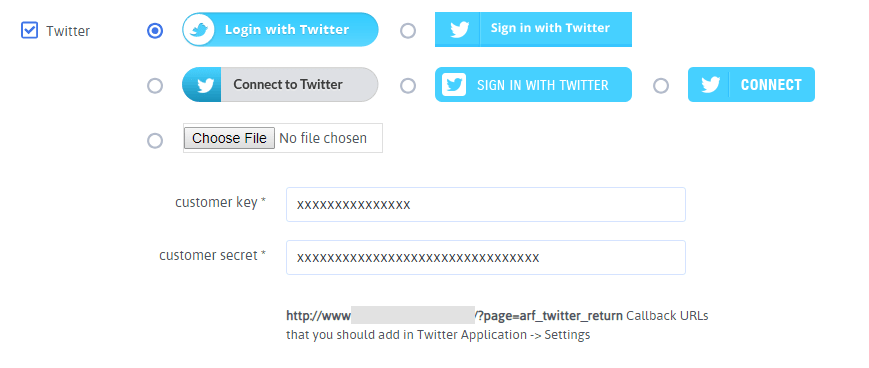
Twitter Configuration Steps
Follow below the steps to get Customer Key and Customer Secret, which you need to use Twitter Login with ARForms User Signup Add-On.
Request Twitter To Elevated Permissions
You must need to get permission from twitter otherwise you’ll not get the email address of users who used Twitter Login of ARForms User Signup Add-on for registration.
1) Go To https://support.twitter.com/forms/platform
2) Select “I need access to special permissions” and then select “Permission to request an email address for Fabric apps”.
3) Enter the Application Name and ID. These can be obtained via https://apps.twitter.com The application ID is the numeric part in the browser’s address bar after you click your app.
4) Permissions Request: “Email address”.
5) Submit & Wait for response
6) After your request is granted, an additional permission setting is added in your twitter app’s “Permission” section. Go to “Additional Permissions” and just tick the checkbox for “Request email addresses from users”.
To get Consumer Key and Consumer Secret, click on OAuth Tool tab in your Twitter Application where you are able to have your consumer key and consumer secret. Copy these credentials from here and use them in ARForms User Signup Add-On where needed.
Create Twitter Application
Following steps will help you to get Consumer Key & Consumer secret for Twitter.
1) Login to your account at https://dev.twitter.com/apps and click on Create New App button.
2)Now fill required information like name, description, the website for your application.
3) Tick Yes, I agree to accept the Terms of services and click on Create your Twitter Application button.
4) Now you have all your created applications on apps.twitter.com
5) Go to the “Settings” tab and add the URL of your website in the website textbox under application Details.
6) Set call back url “http(s)://your-site-url/?page=arf_twitter_return” in Callback URL.
Save the settings and you can use Consumer Key and Secret in ARForms User Signup Add-On
LinkedIn Configuration
To enable social login with LinkedIn in ARForms User Signup, you need Client ID and Client Secret for LinkedIn.
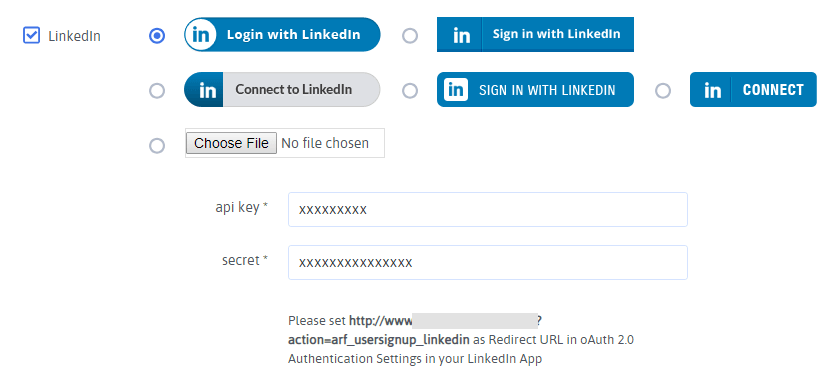
To get these credentials, please follow below steps
1) First of all login in your LinkedIn account and go to https://www.linkedin.com/secure/developer?newapp.
2) Click on Create Application from the top left hand side.
3) Provide all the information asked to fill here. you can use dummy data except for Website URL, provide an absolute URL and click on Submit.
4) Now Go to javascript from the left panel. Enter your website URL in “Valid SDK Domains” and press the Add button and then press update.
Copy Client ID and Secret and use them in ARForms User Signup Add-On
Google Configuration
To enable social login with Google, you first need to configure Google Client ID and Client Secret.

In order to get keys for Google, you have to follow the steps given below.
-
- Create Project
1) First, you have to login to your google account in order to create a project.
2) Go to the Google Developers Console and click on Create an empty project
3) After then dialog box will appear where you have to provide your Project name and a Project ID for your new app and click Create.
4) Enable Google APIs, and go to API & auth from sidebar where you get the list of APIs.
5)In the list Find Google API and set its status ON and enable Google API.
6) Now get your CLIENT ID and API KEY as described below.
Client Key and Client Secret
Go to the Credentials and create credential from Create Credential > OAuth Client ID. Fill Authorised JavaScript Origin” and “Authorised redirect URLs” and click Create.
You’ll see popup including your Client ID and Client Secret, copy that keys and use them in ARForms User Signup.
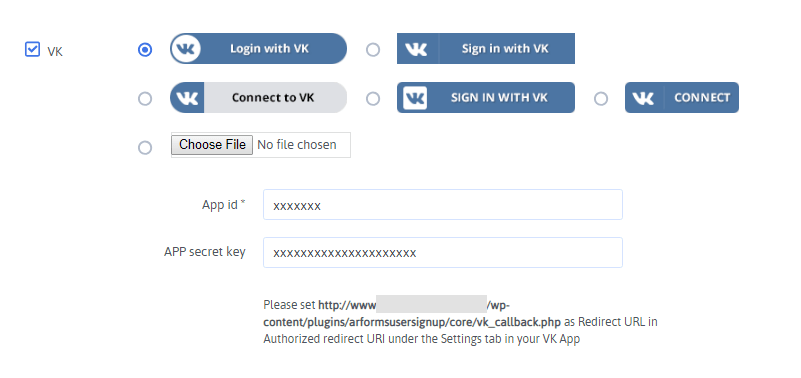
VKontakte Configuration
To enable VKontakte social login, you need App ID and App Secret Key. In order to get these API details for VKontakte, please follow steps given below.
1) First of all login to your VKontakte account.
2) After login create a new app by click on Create An Application.
3) It will be required to confirm the request via SMS for the security reason.
4) Register your new application by filling information asked there, complete the form and Save your application.
5) Once the application is registered, you will have your APPLICATION ID and SECURE KEY as described below.
Application Id and Secure Key
Go to the Settings page.
Enter Authorized redirect URI as following,
http://yoursite.com/wp-content/plugins/arformsusersignup/core/vk_callback.php
(replace yoursite.com with your actual domain)
You can also get URL at VKontakte options at Social Login Configuration in ARForms User Signup.
Now you can get Application Id and Secure Key.
Copy these keys and use them in ARForms User Signup.
Changelog
Version 1.8 (02 January 2020)
- Added Compatibility for ARForms version 4.0
- Added new facility to assign a specified ARMember plan after user registration with this addon.
- Added new facility to login with email along with username.
- Minor bug fixes
Version 1.7 (08 April, 2019)
- Remove social login with Google+
- Added support for social login with Google.
- Added support for social login with VKontakte.
- Minor bug fixes
Version 1.6 (20 April, 2018)
- Added facility to allow user to choose their role while registration.
- Added compatibility of ARForms version 3.3 for email notification.
- Minor bug fixes
Version 1.5 (20 February, 2018)
- Minor bug fixes
Version 1.4 (01 December, 2017)
- Added Avatar Field for mapping.
- Added Social login/signup Facility.
- Added compatibility with ARForms version 3.0.
- Other small bug fixes.
Version 1.3 (18 December, 2014)
- Added Reset Password Functionality.
- Added support to display username.
- Other small bug fixes.
Version 1.2 (20 October, 2014)
- Added BuddyPress profile meta support.
- Other small bug fixes.
Version 1.1.1 (21 August, 2014)
- Added more security with ARForms Payment Addons.
- Minor CSS changes and other small bug fixes.
Version 1.1 (05 August, 2014)
- Added User Custom Roles Support.
- Minor CSS changes and other small bug fixes.